1. Introduction
Kusuri Memo is a simple app that helps you avoid forgetting to take your daily medications. You can record it with just one tap of the "Taken!" button. You can share your status with trusted supporters even at a distance.
- Those who take medicine every day
- People who often forget whether they have taken their medicine or not
- Family members and carers who monitor medication status remotely
- Care-home and home-care teams checking adherence with patient consent
- Doctors and nurses in hospitals/clinics reviewing patient self-logs with consent
- People who want a medication notebook to show dose history during appointments
- People tracking supplements, Kampo, or as-needed medicines
- People needing stricter short-term tracking (for example after surgery or during a new treatment phase)
Kusuri Memo is available for free. In the free version, you can register up to one type of medicine. If you upgrade to the premium version, you can register as many types of medicine as you like. You will also be able to check up to 90 days of records and share your status with trusted supporters.
1.5 First 30-second guide
This short walkthrough shows the first-time flow: setup, add a medicine, mark as taken, and review the log.

2. Basic usage
- Tap "Settings" from the menu at the bottom of the screen.
- Tap the "Add Medication" button.
- Enter the drug name and tap the "Add" button. (e.g. blood pressure medication, morning tablets)
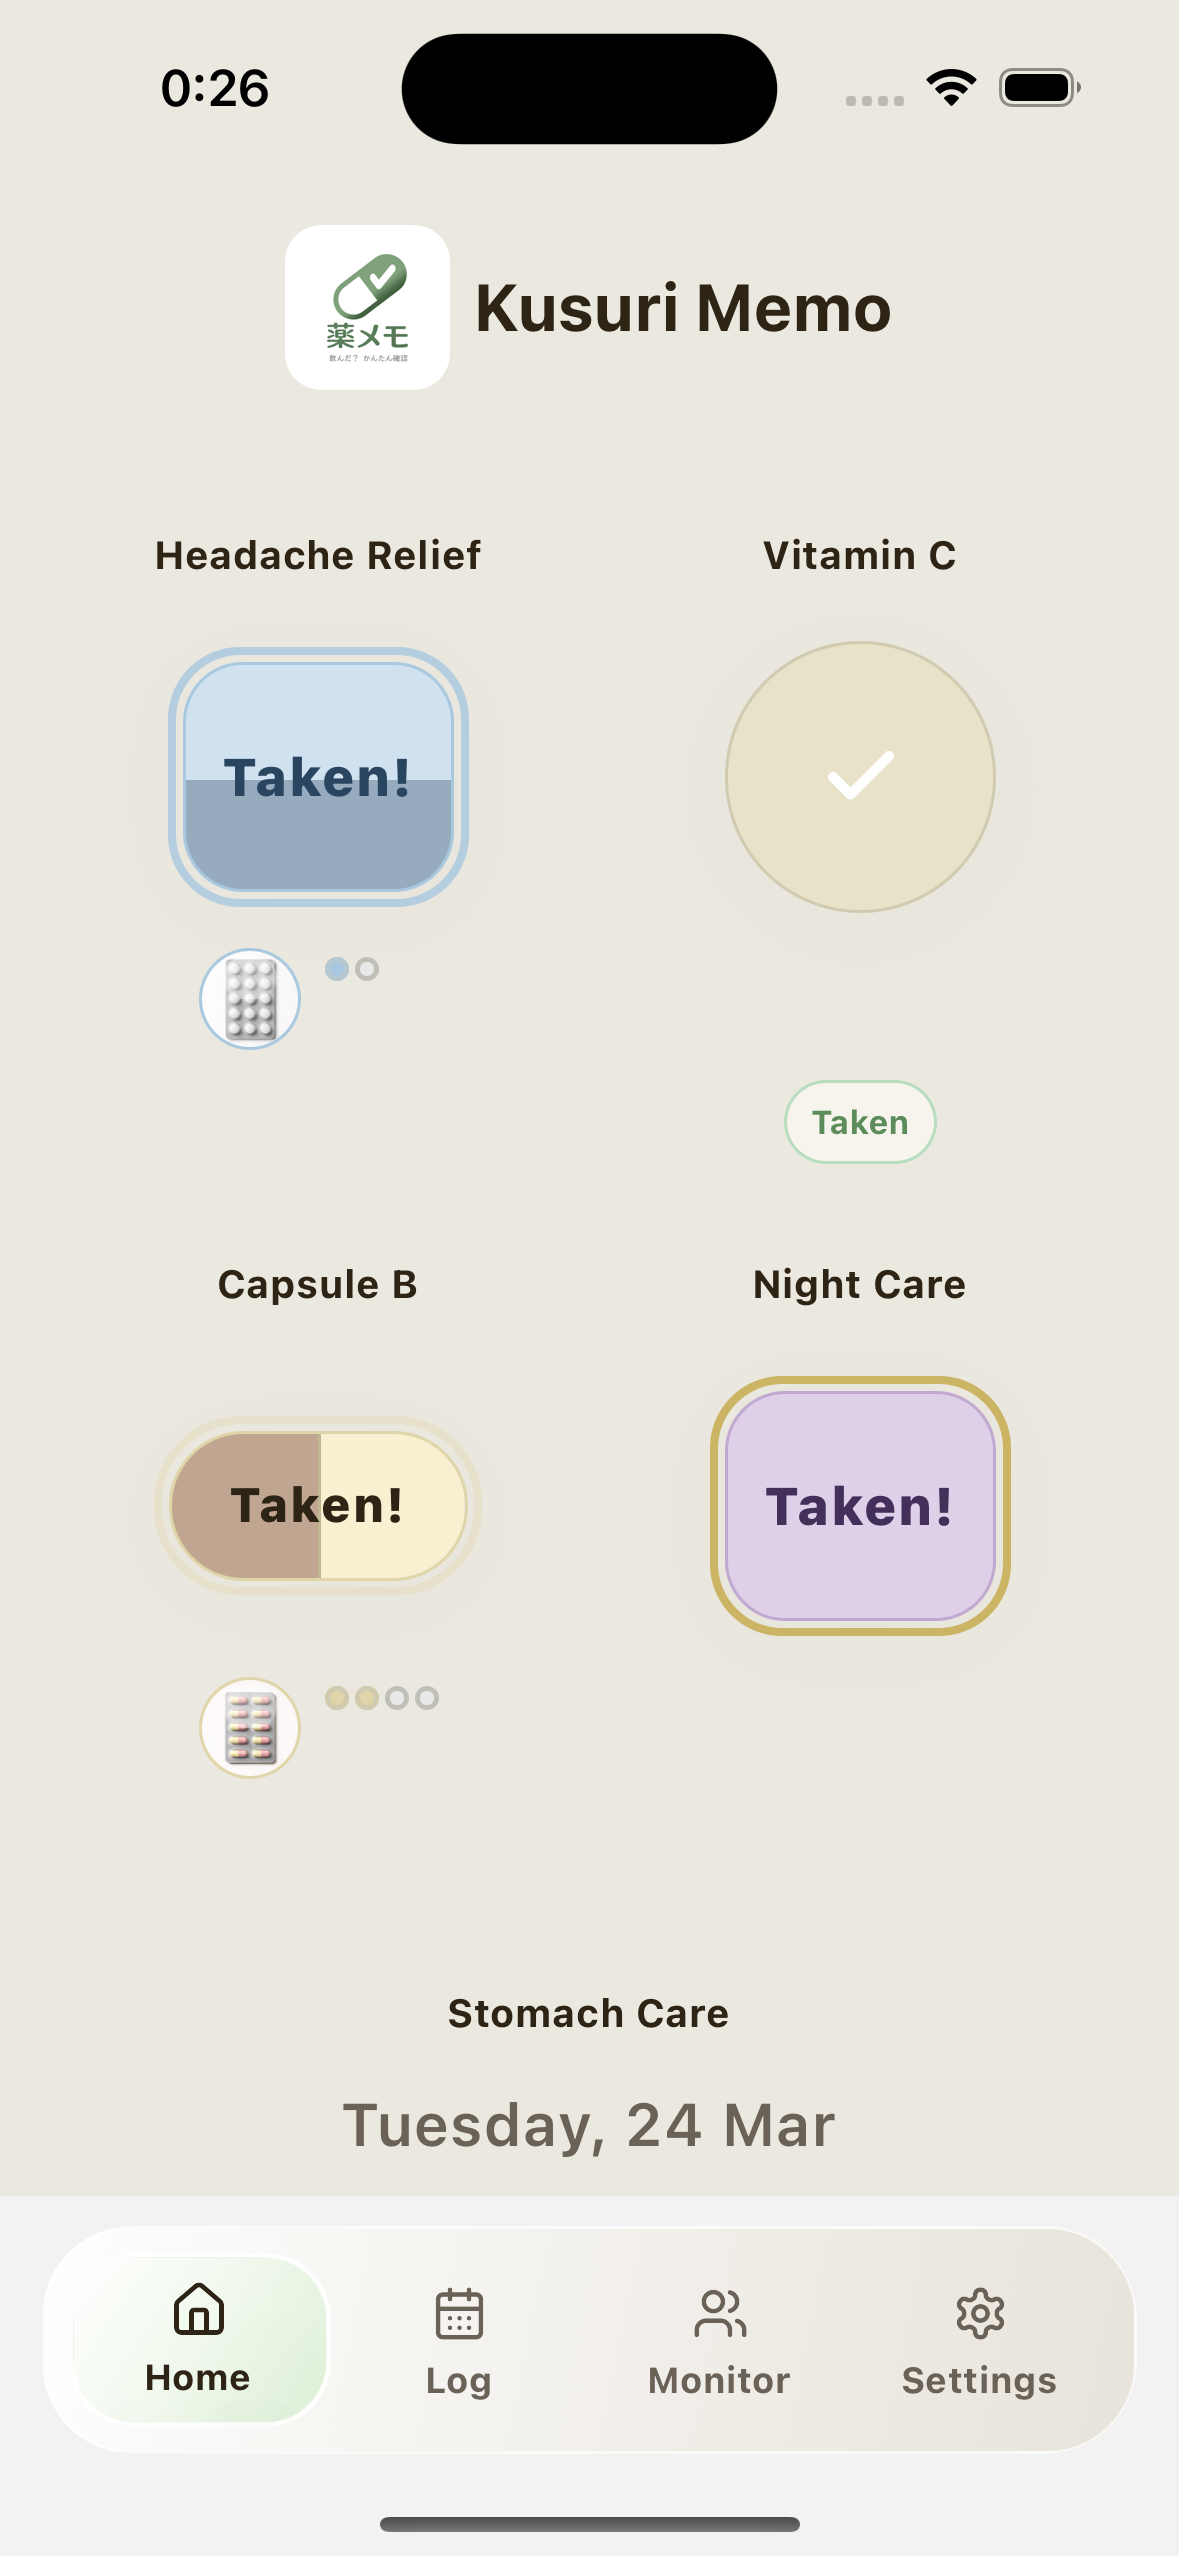
- When you return to the Home screen, the button for the registered medicine will appear.
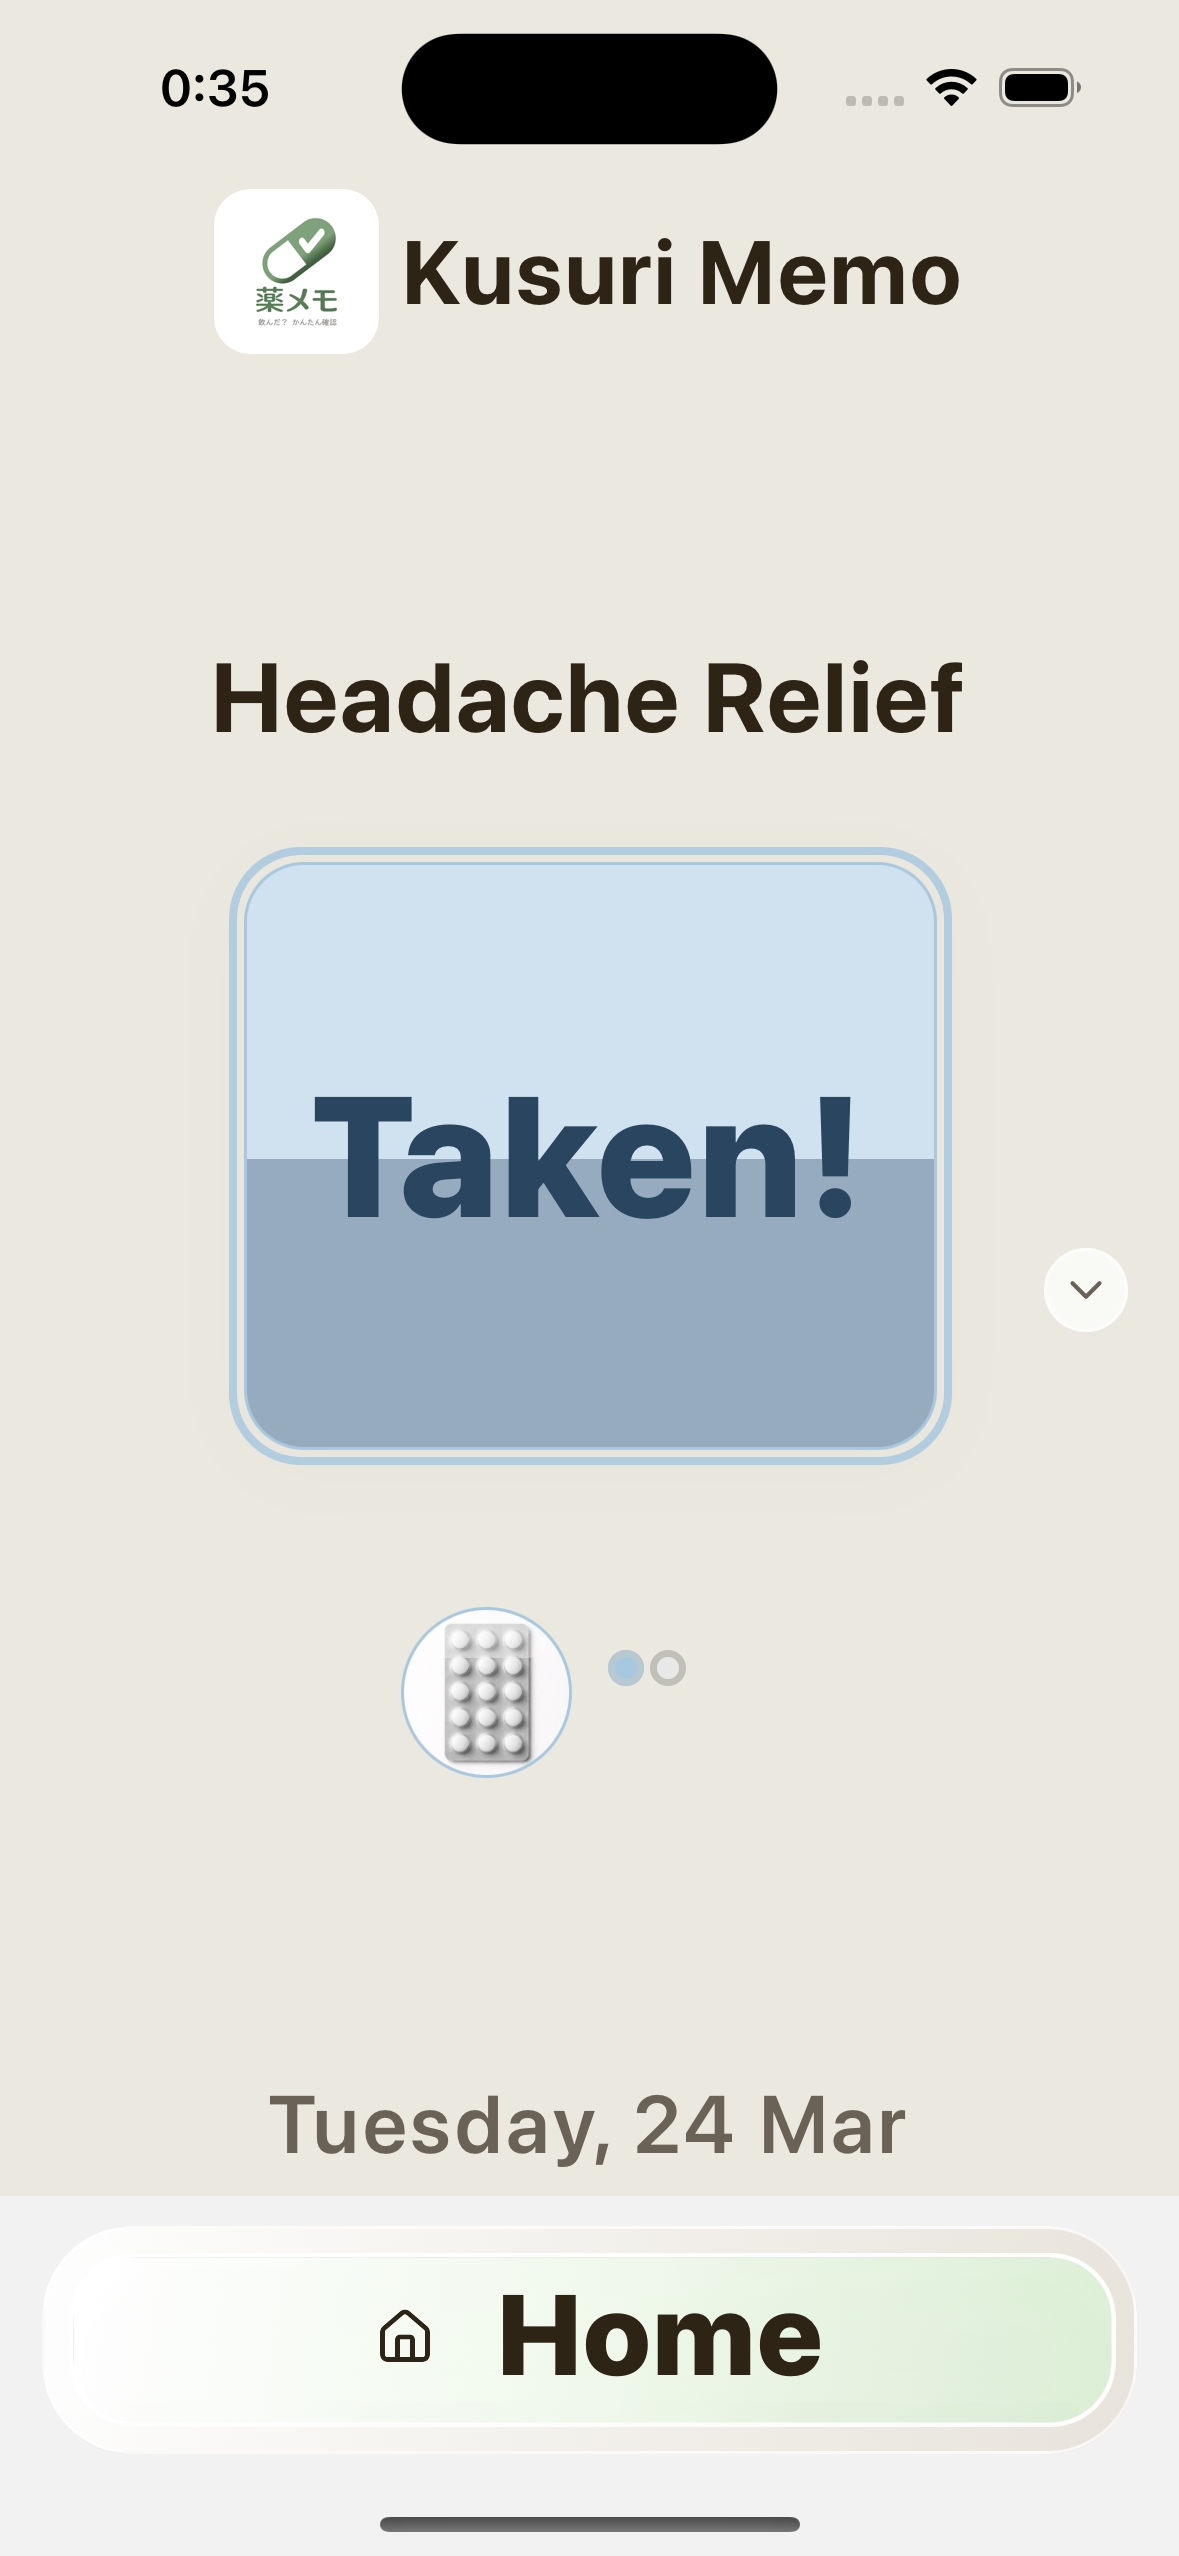
- Open the home screen.
- Tap the "Taken!" button with the name of the medicine written on it.
- A check mark (✓) appears on the button and the time of the dose is recorded.
- You can cancel the entry within 30 minutes of pressing the "Taken!" button.
- Tap the "Cancel" button that appears below the button.
- The recording will be cancelled and the button will return to its original state.
- Open the "Settings" tab and tap the name of the registered medicine to expand it.
- Turn on the "Notifications" switch.
- Enter the time you want to receive notifications in the "Notification time" field. (Example: 08:00)
- Your settings will be saved automatically.
3. Medicine photos
If you register a photo of your medicine, a thumbnail will be displayed on the button on the home screen. You will be able to see at a glance which medicine you are taking.
- Open the Settings tab and tap the name of the medication you want to add a photo to to expand it.
- Under "Medicine Photo", tap "Take a photo" or "Select from library".
-
Take a photo: The camera will start. Please take a photo of the actual medicine.
Note: On Android, camera screens can vary by device and camera app. The basic flow is: take the photo -> confirm it -> adjust crop (for the Home-screen preview).
Choose from library: You can choose from photos saved on your smartphone. - Once the photo is saved, a preview will appear on the settings screen.
- When you register a photo, a small photo icon will be displayed on the top right of the "Taken!" button on the home screen.
- Tap the photo icon to open a larger preview.
- Close by tapping the screen or clicking the "X" button.
- Expand the medication details on the Settings tab.
- A preview of the currently registered photos will be displayed in the "Medicine Photos" section.
- You can replace photos with "Take photo" and "Select from library", and remove them with "Delete".
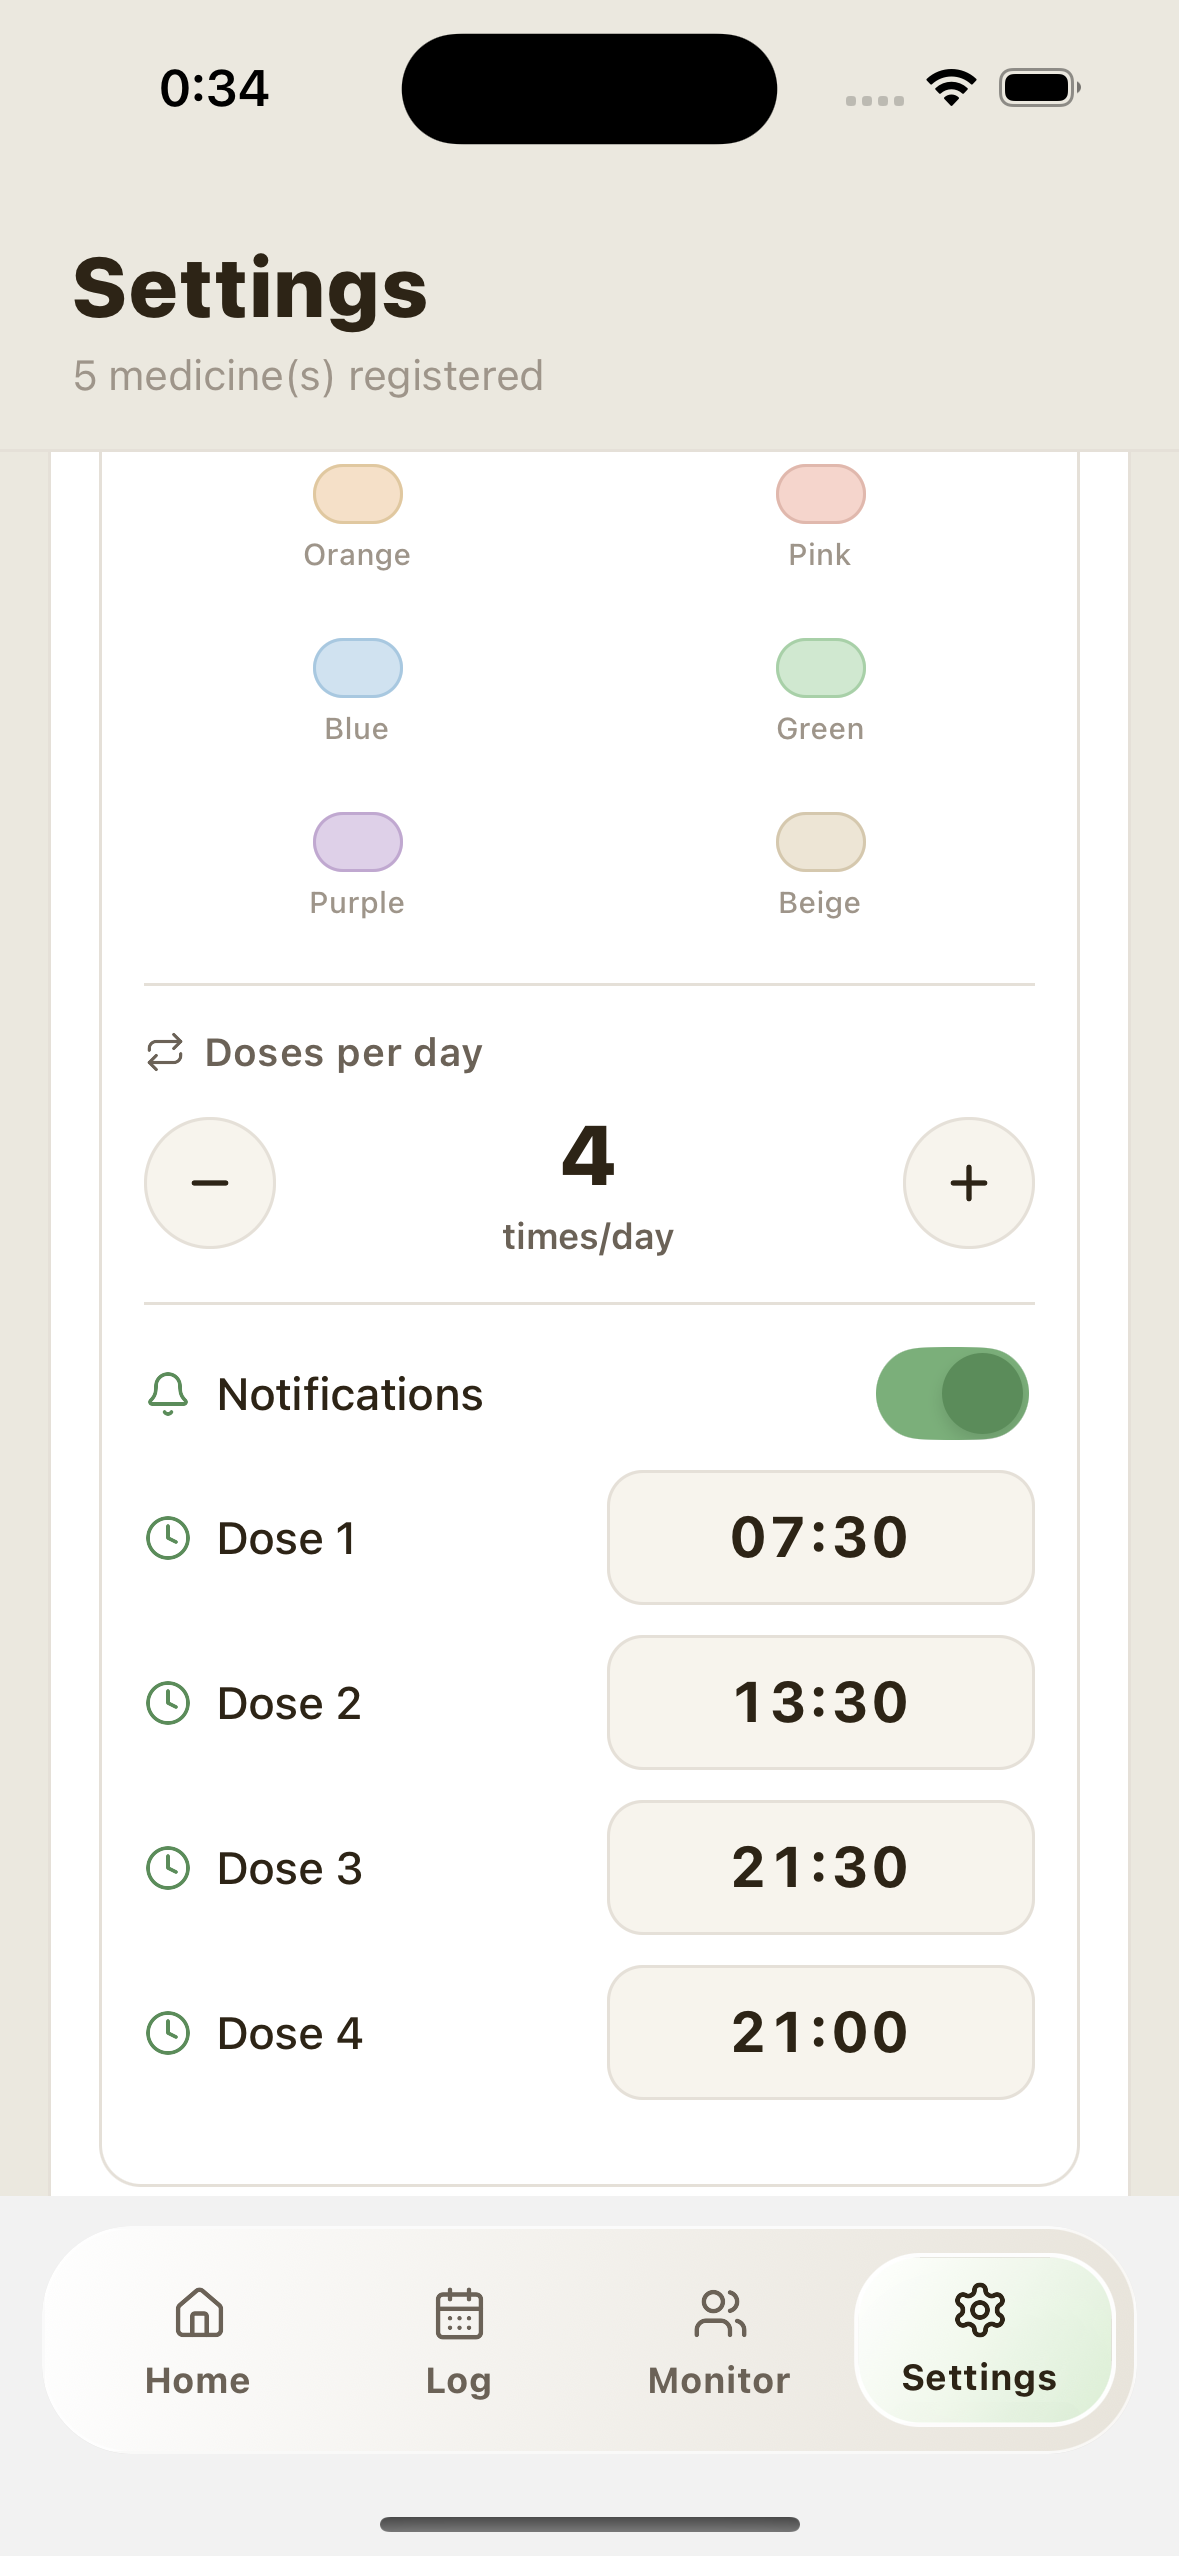
4. Multiple doses
- Expand the medication details on the Settings tab.
- Tap the "+" button in the "Number of doses per day" column to increase the number of doses. (Can be set from 1 to 12 times)
- Once you set the number of times, a field will appear where you can enter the time for each dose. Please enter the time.
For medications taken multiple times a day, small circles (dots) appear below the button on the Home screen.
- Number of dots = number of doses per day
- Coloured dots = number of doses taken
- White dots = number of doses not yet taken
- When you tap the "Taken!" button, one dose is recorded.
- The dots will change colour one by one.
- A check mark will appear on the button when you have taken all the doses.
5. Log
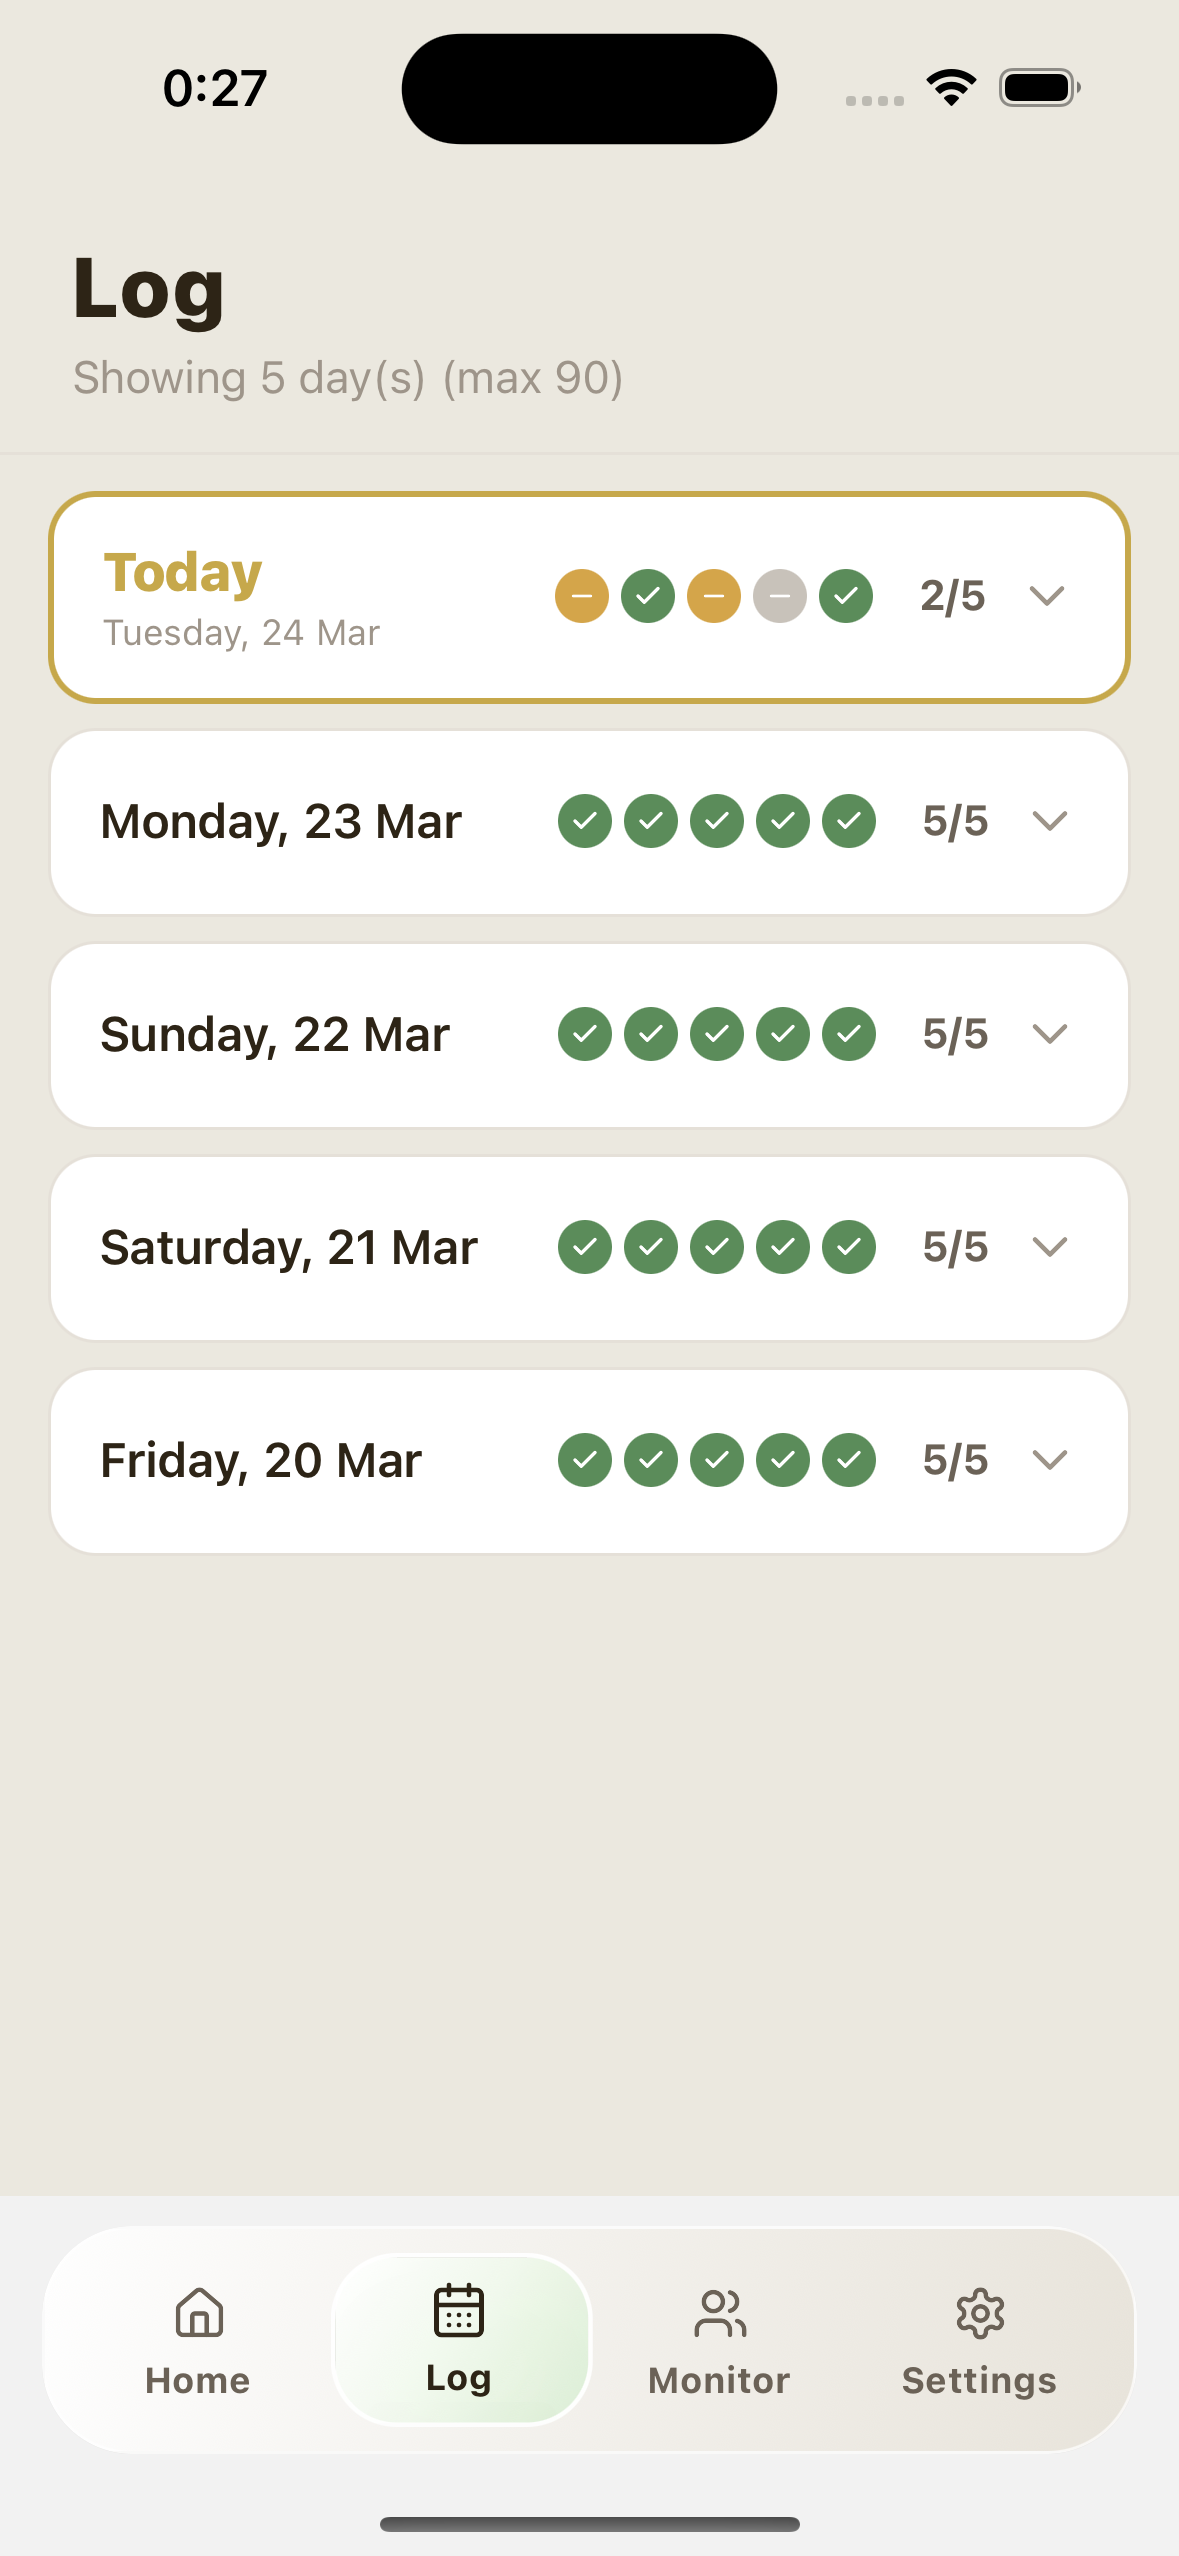
On the "Log" tab, you can check past medication status by date.
- Tap the "Log" tab from the bottom menu.
- A list of cards by date will be displayed. Today's card is prominently displayed with a gold border.
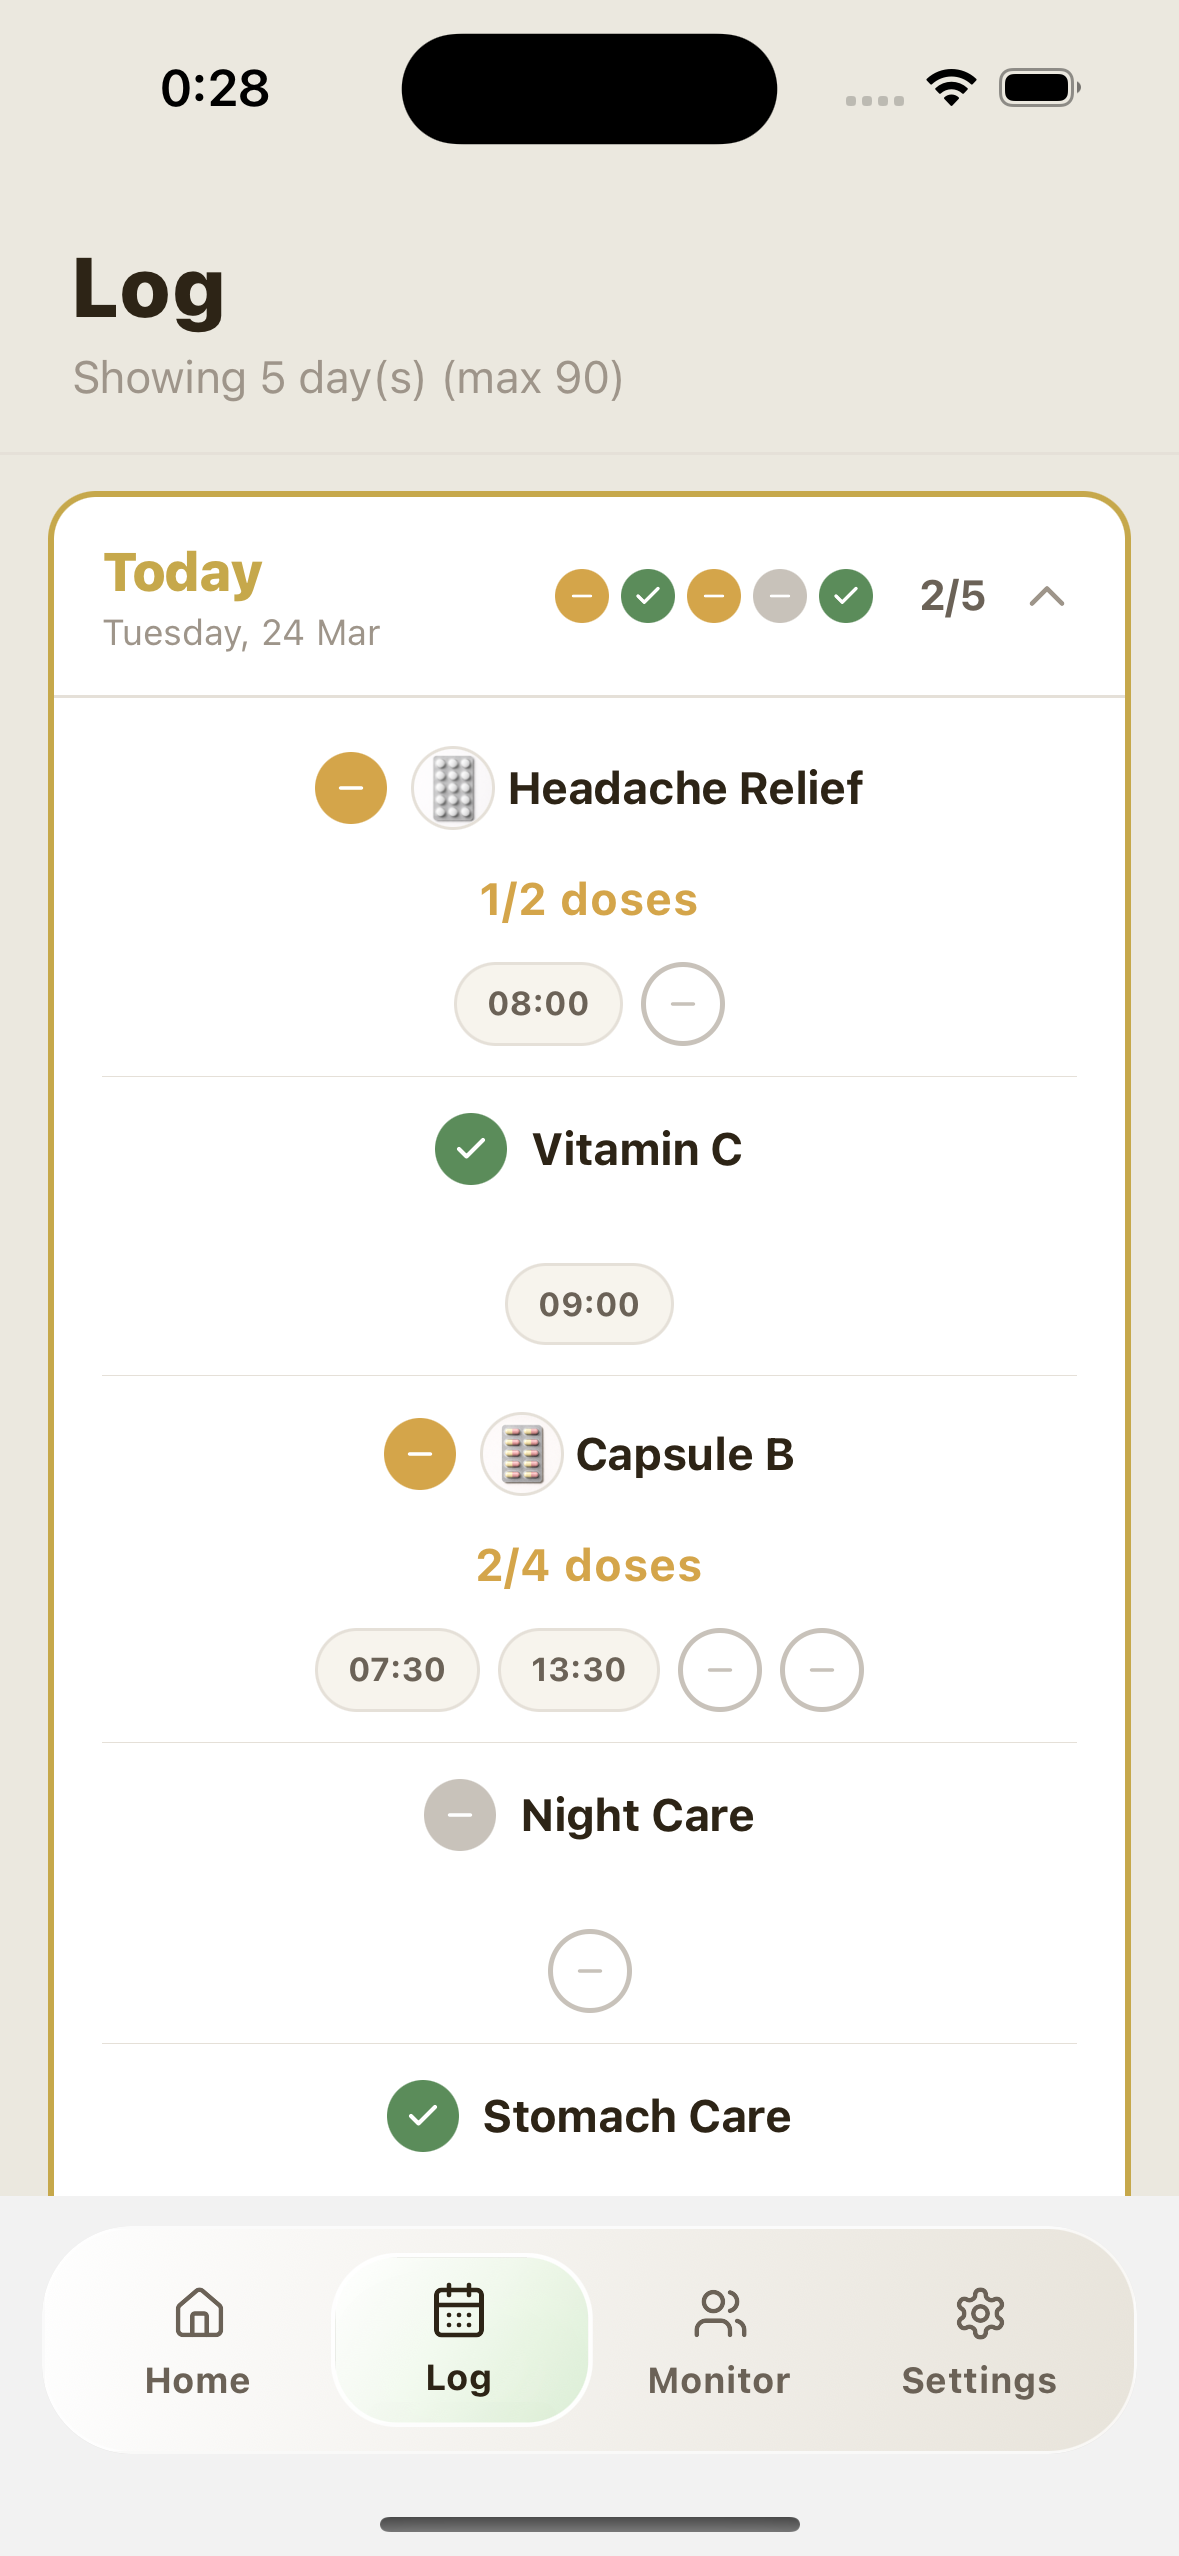
- When you tap the card, the details for that day (the status and times of each medication) will be displayed.
When you expand the card, you can see the exact time each dose was taken. If you have taken multiple doses, the times for each dose are shown side by side.
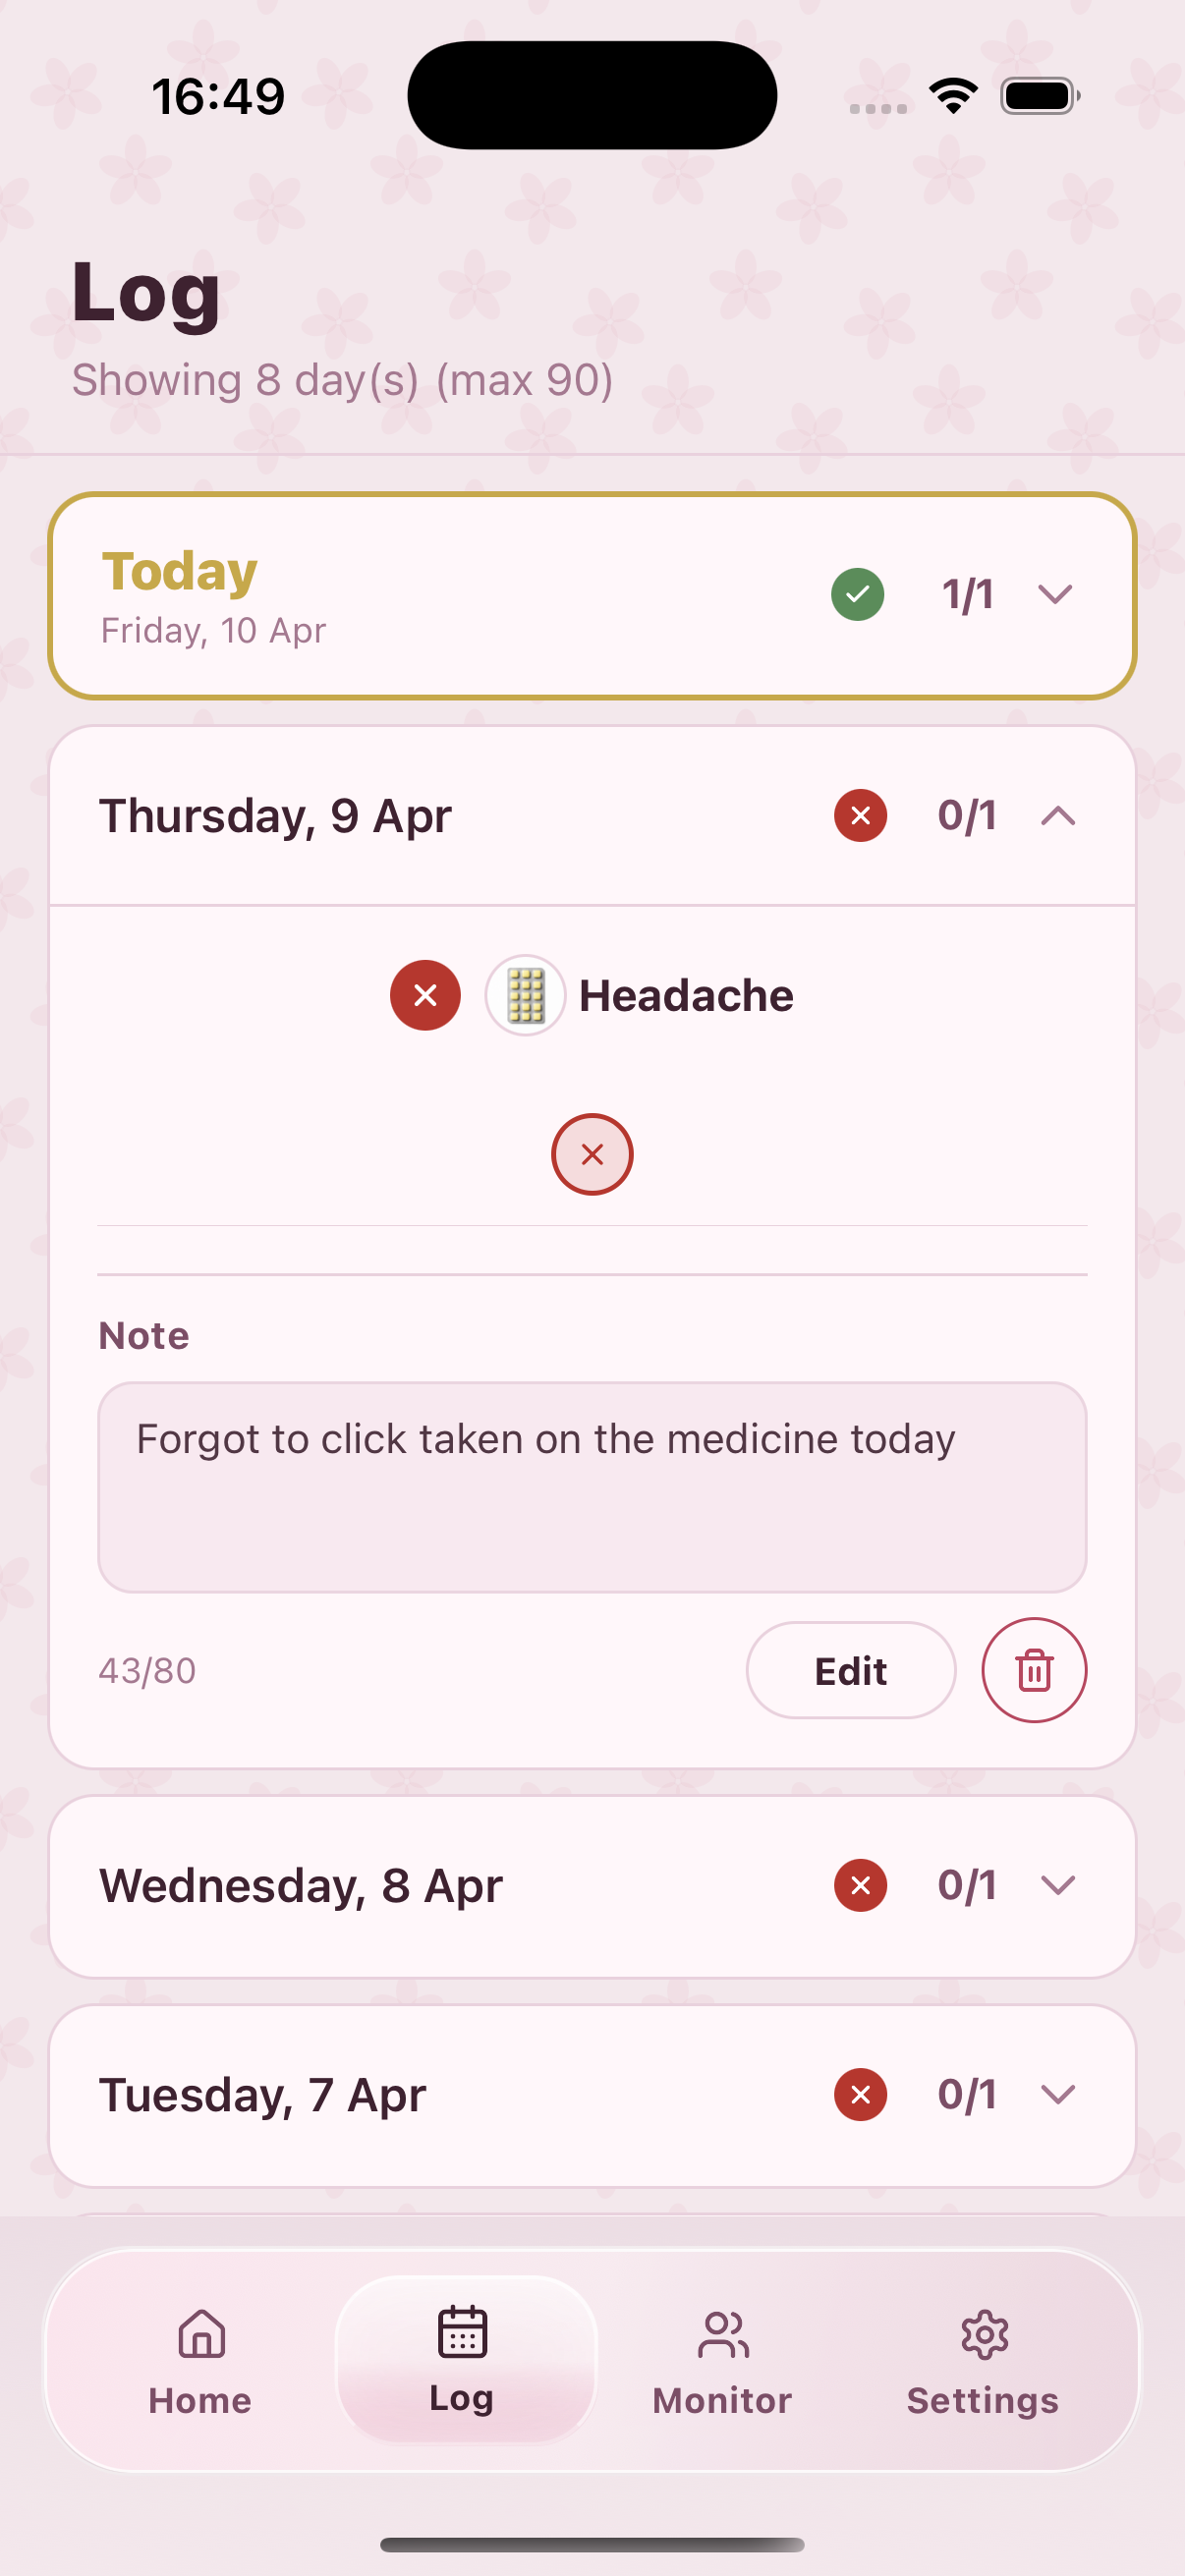
- Open a past-day card with missed (✕) or partial (—) status to show the note field.
- Save a short note to keep context on why the dose was missed.
- You can edit or delete the note later.
Premium version: You can check records for the past 90 days.
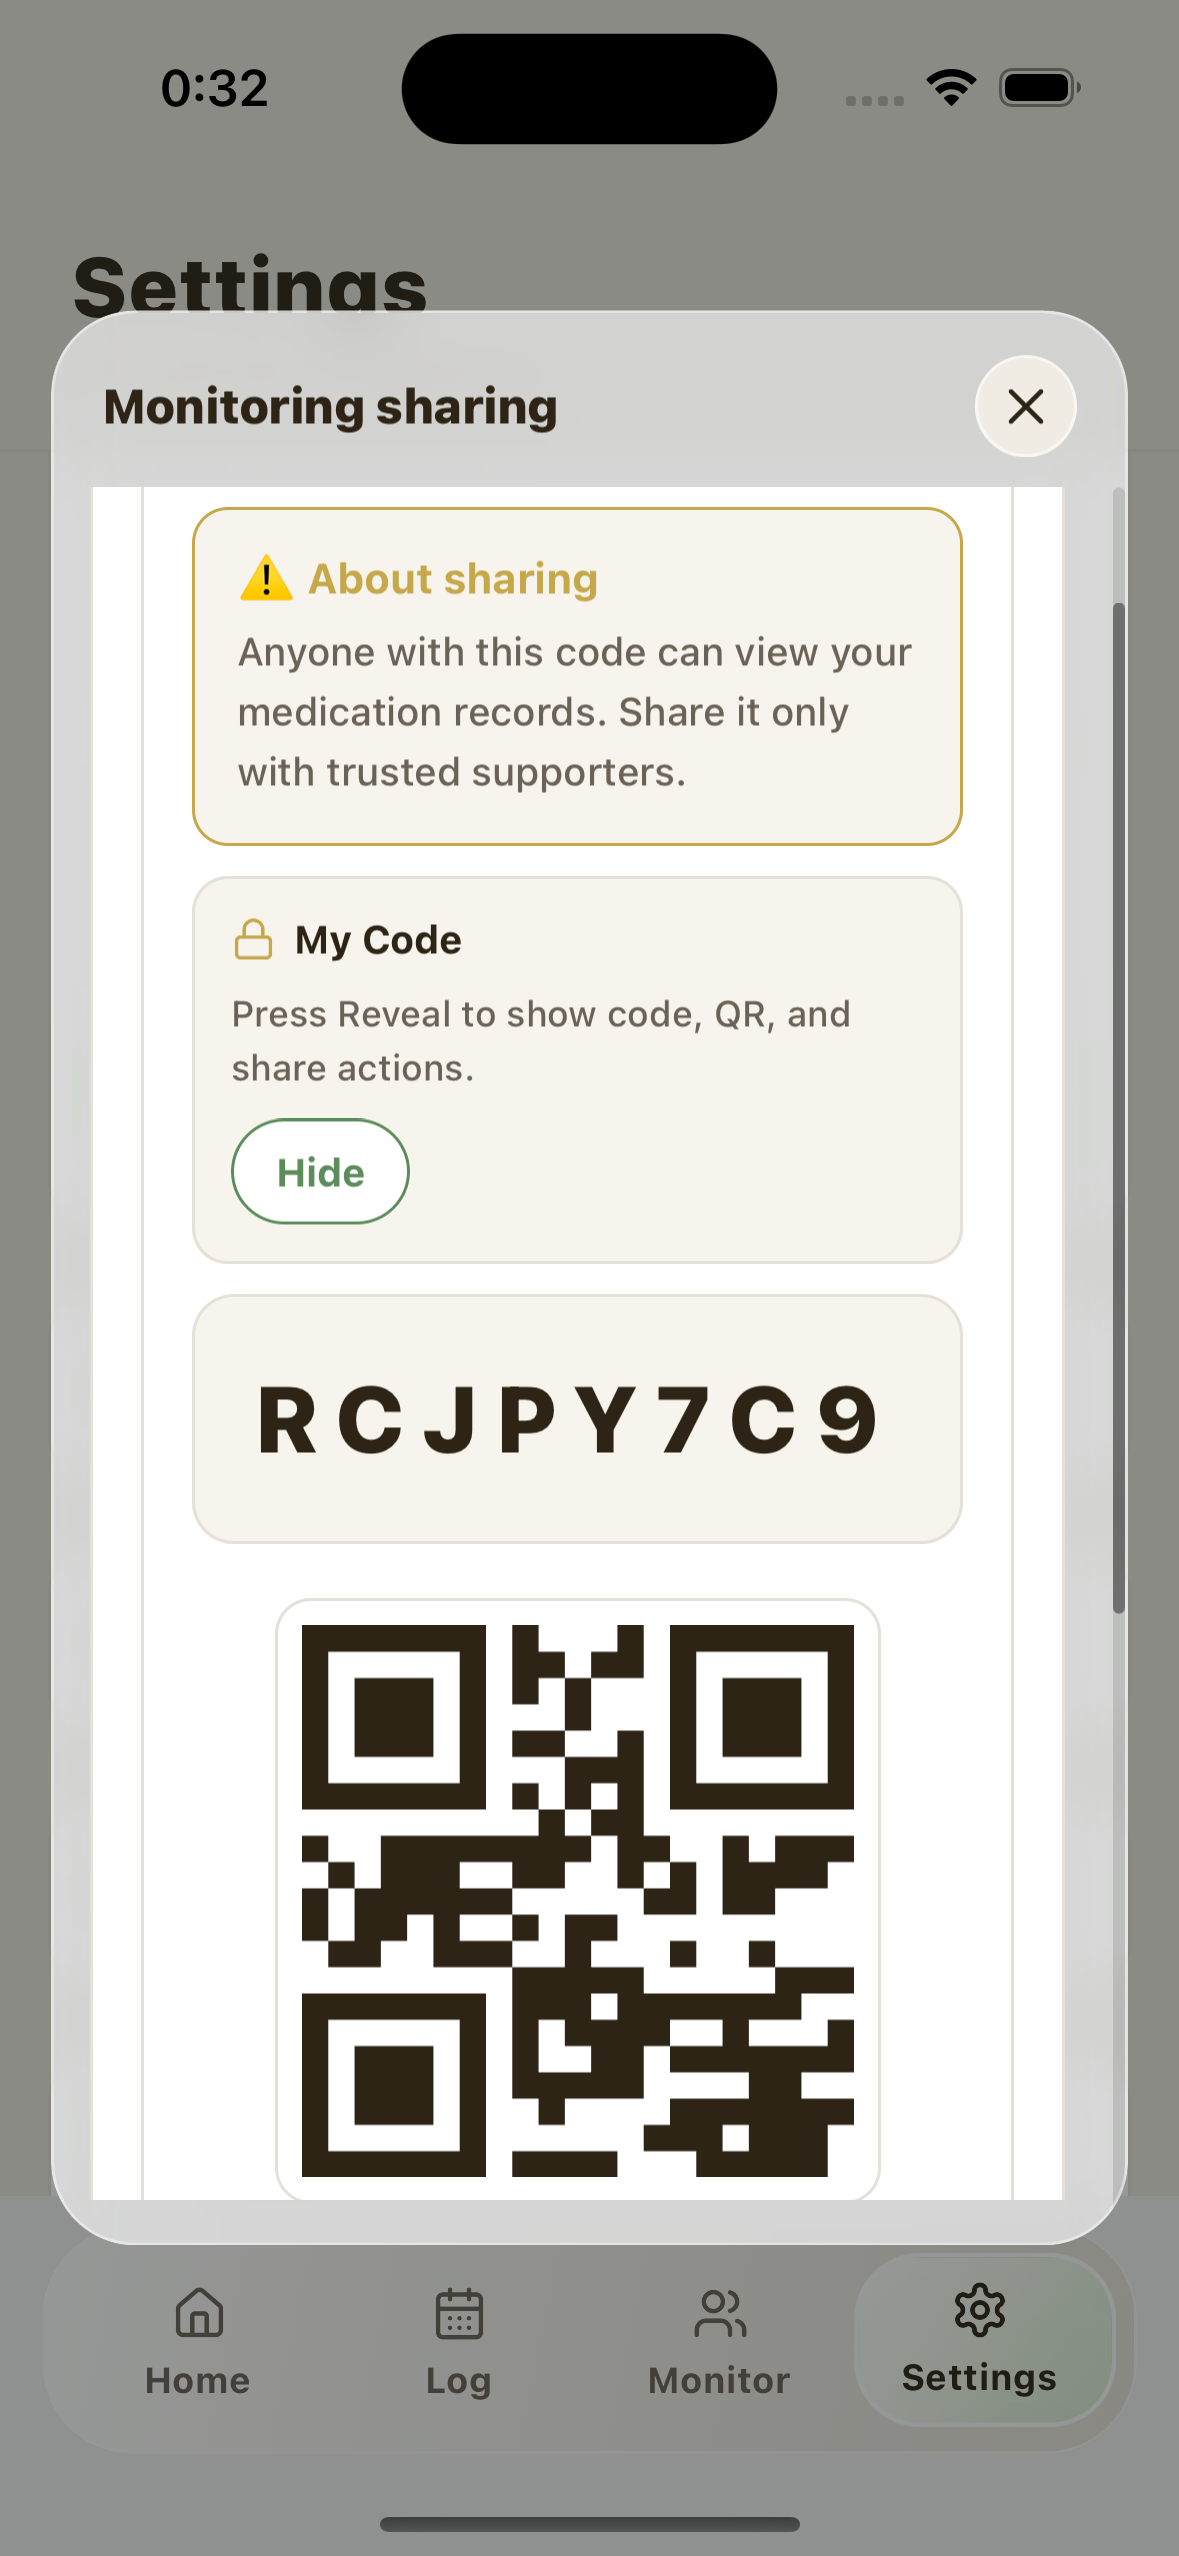
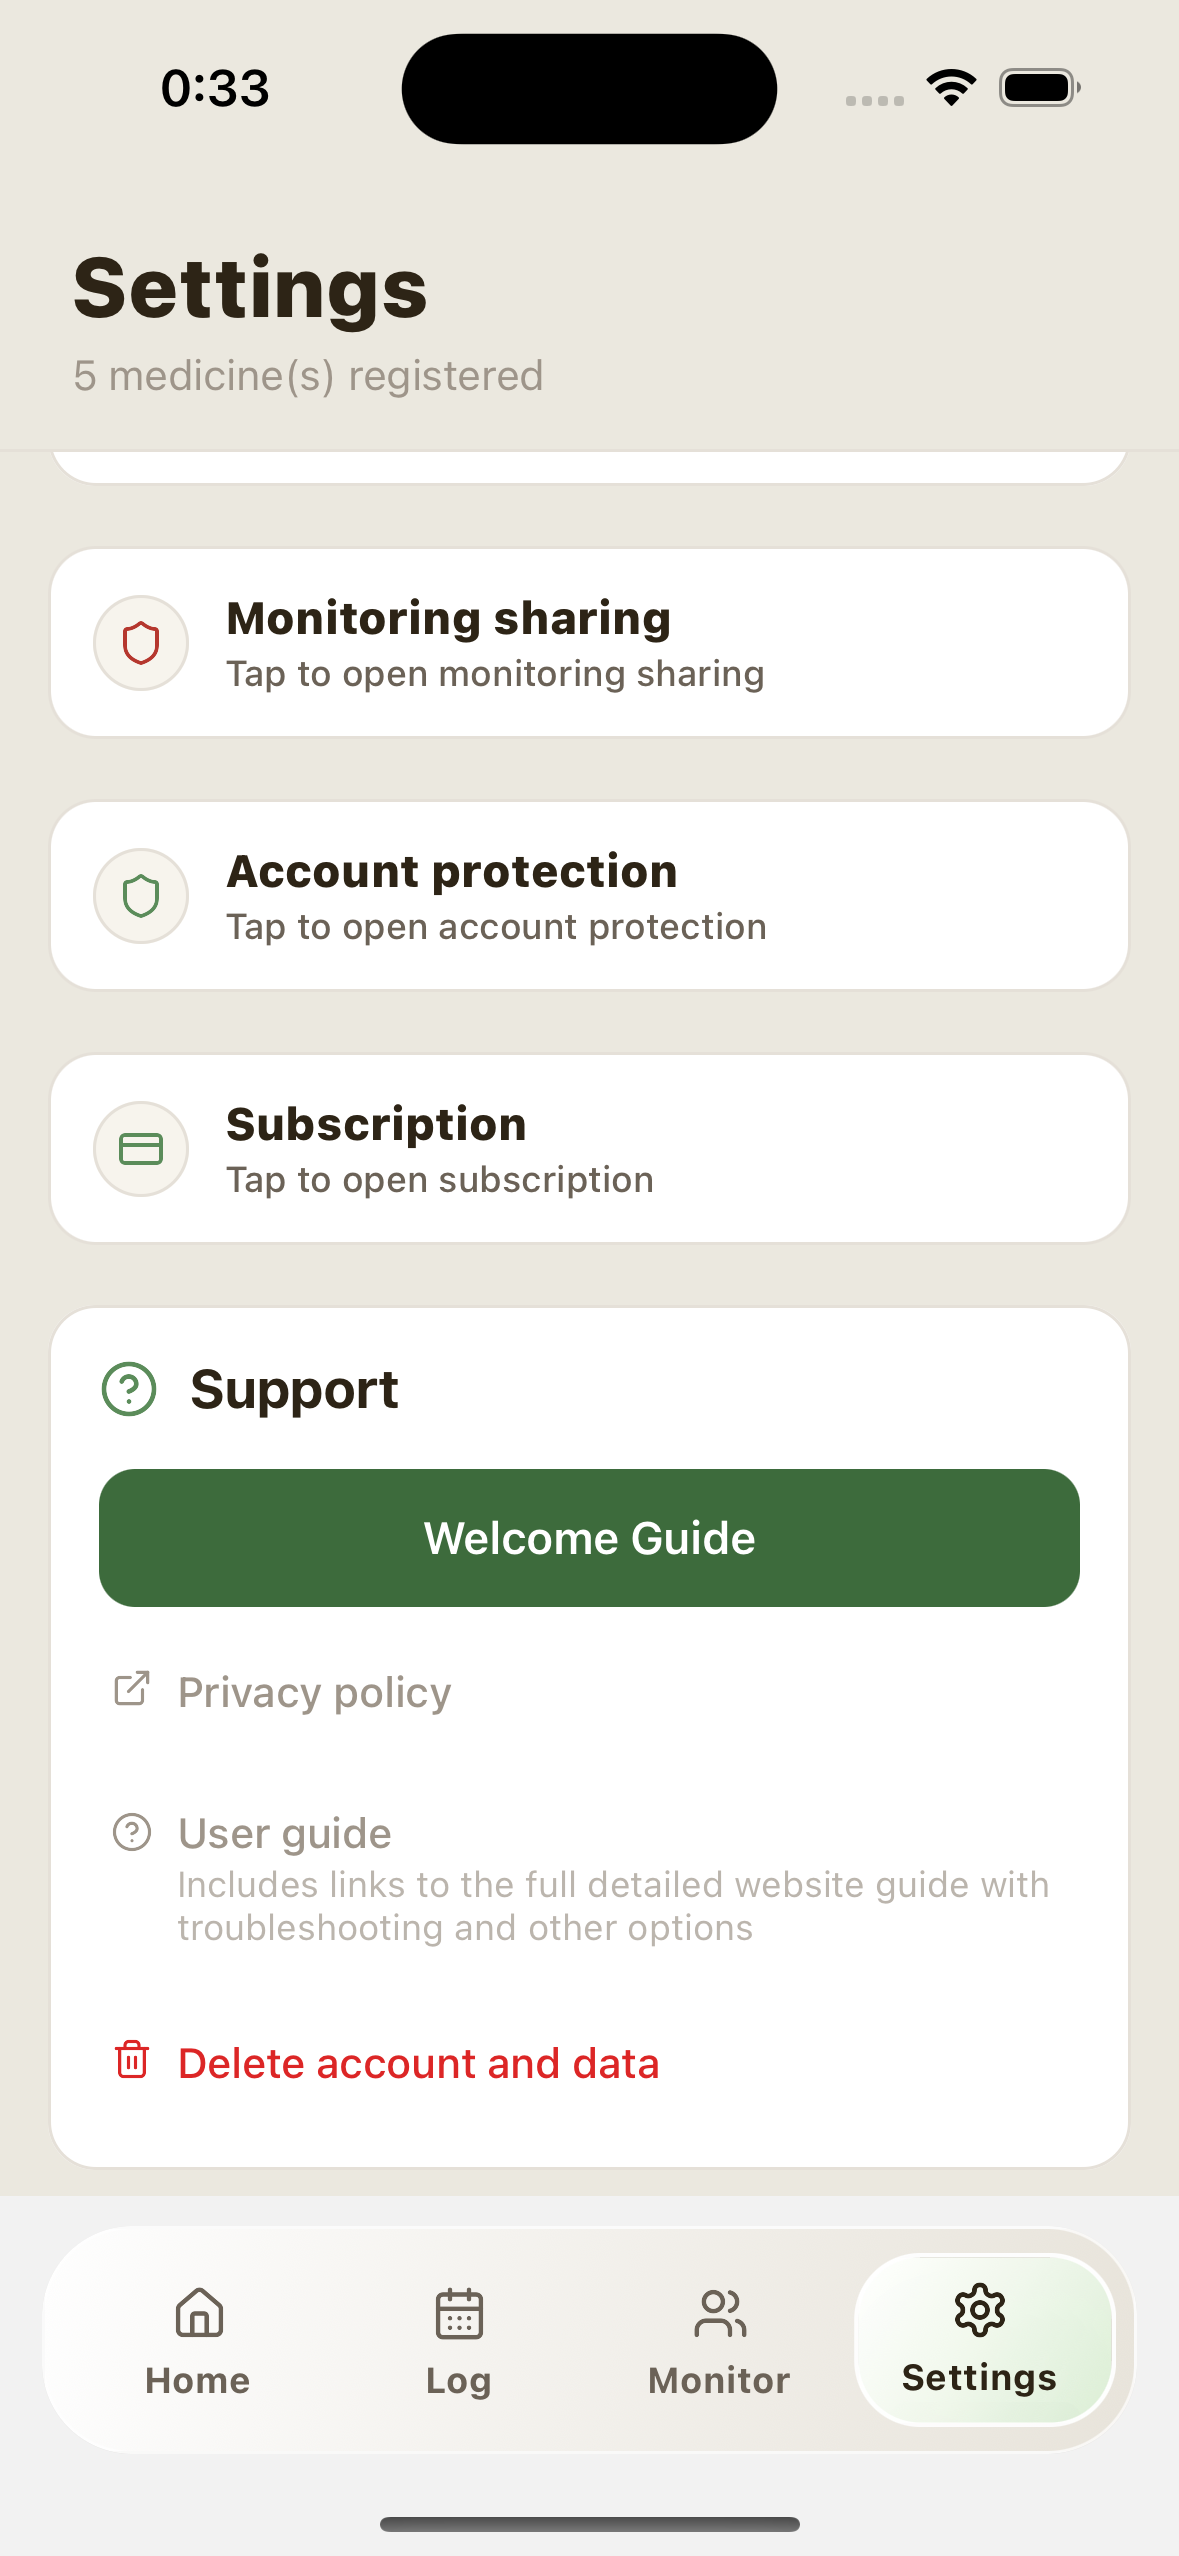
6. Monitoring sharing
- Open the "Settings" tab and find "Share my code".
- An 8-digit shared code will be displayed. Share this code with your trusted monitor.
-
Quick share:Up to 3 installed sharing apps are shown in preferred order. Tap an icon to share directly in that app.
More:Tap "More" to open the device share sheet for other apps and copy options (LINE, WhatsApp, Telegram, Signal, Mail, etc.).
QR code:A QR code is also shown below the code, so monitors can scan it directly.
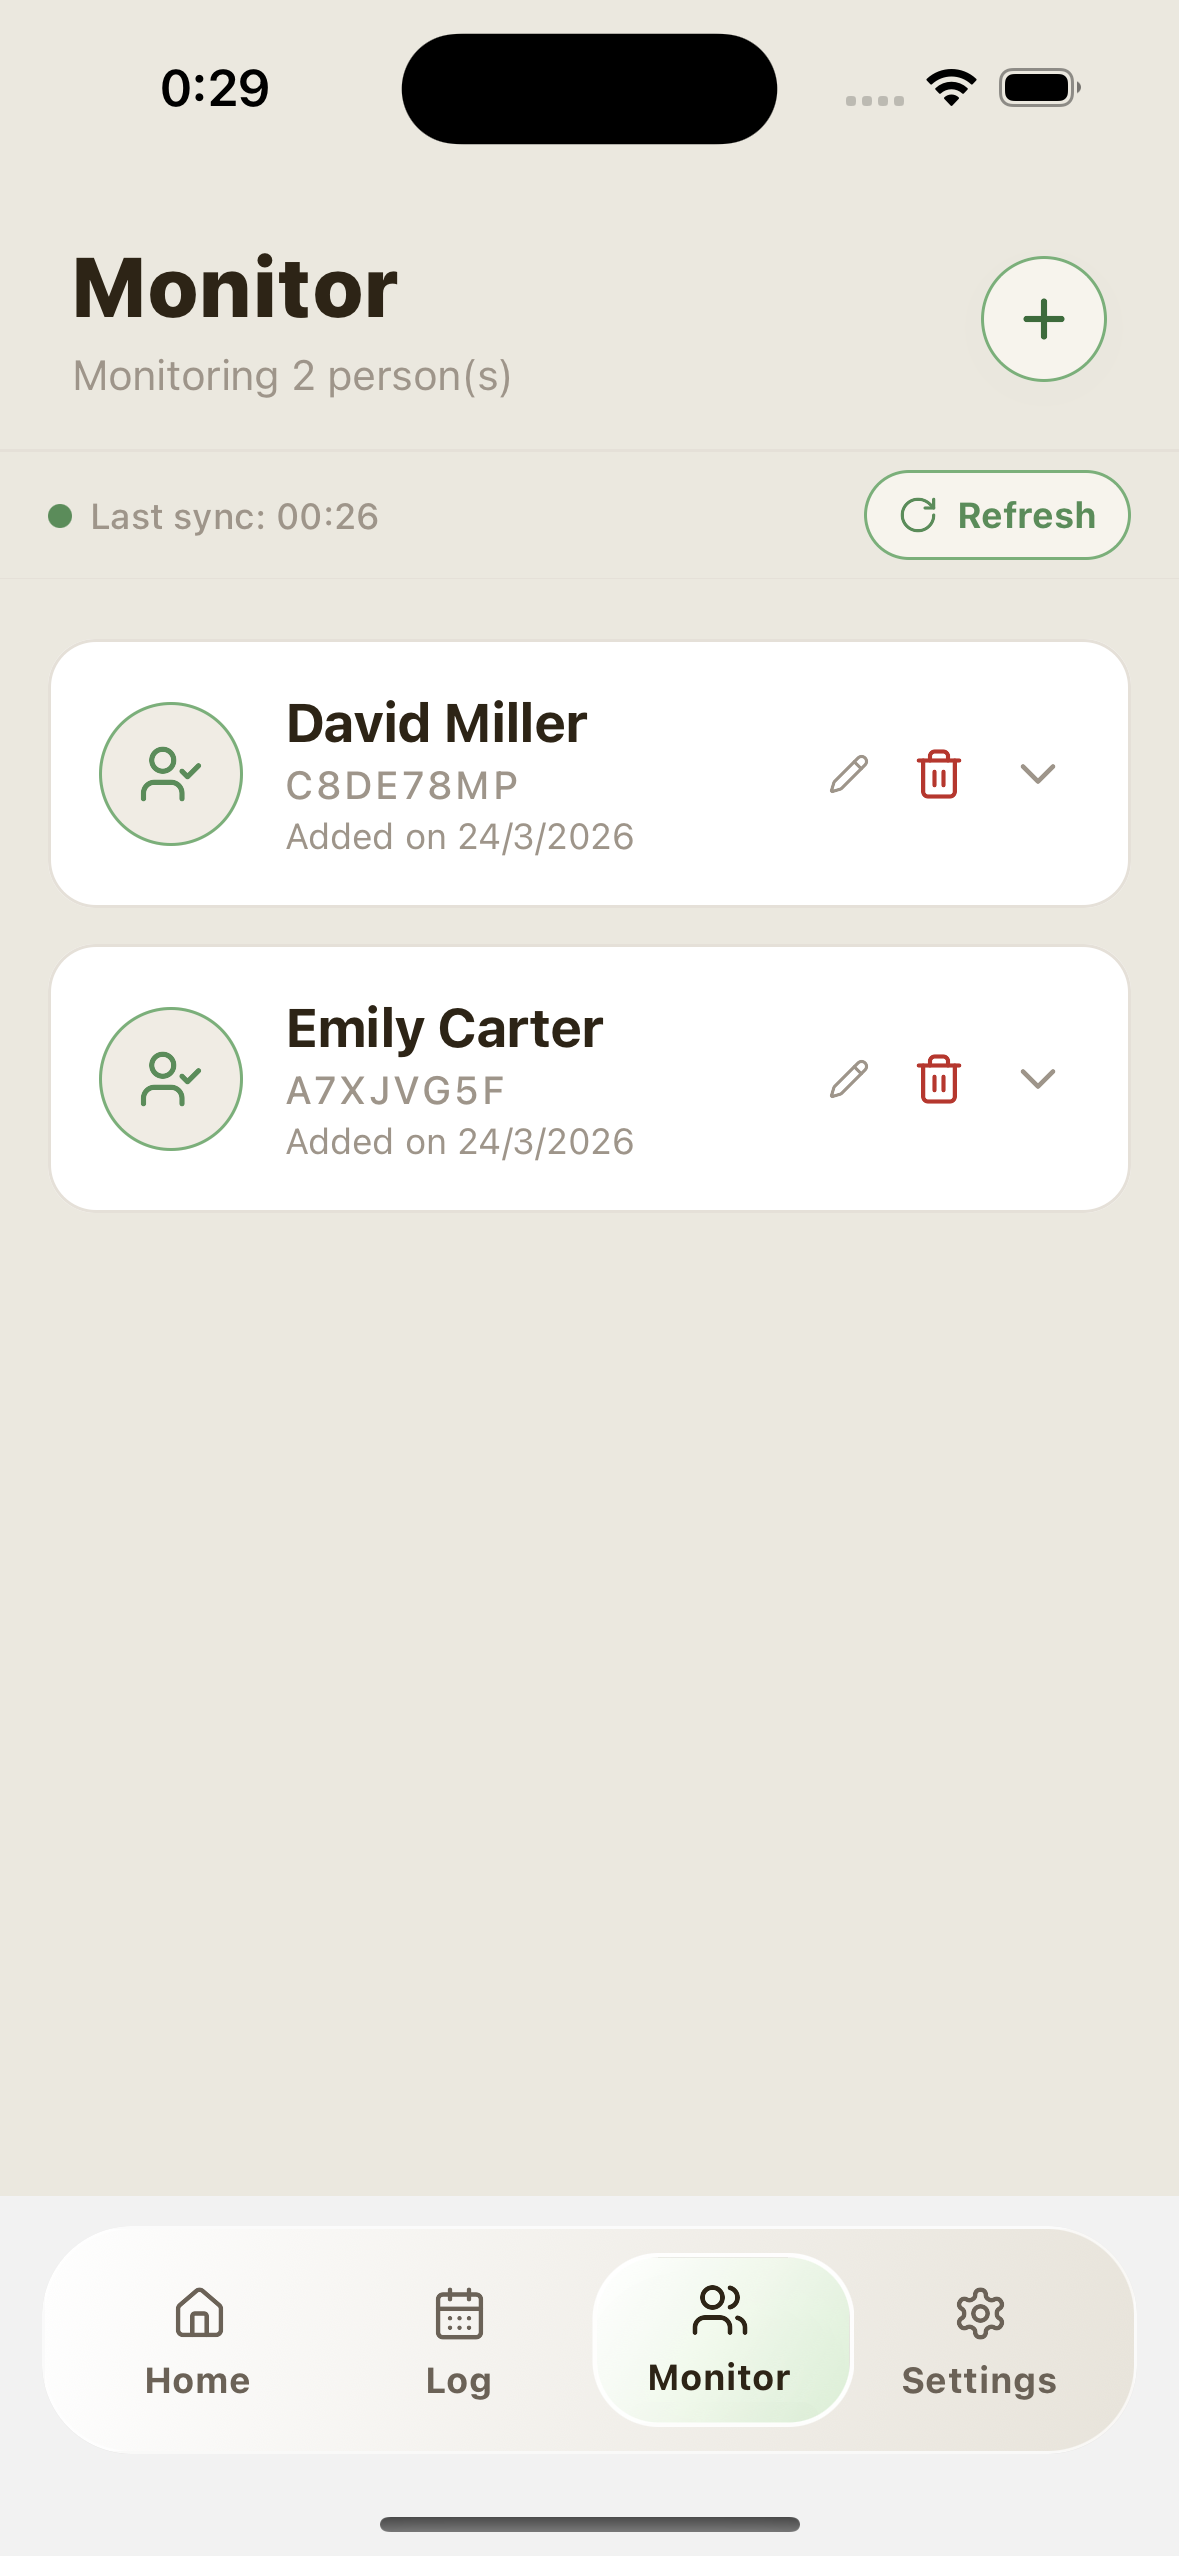
- Open the "Settings" tab and find "Enter shared code".
- Enter the shared code and tap "Confirm".
- You can review medication status from the "Monitor" tab in the bottom menu.

- In the Monitor tab, open a linked user card and check the "Receive notifications" switch.
- This switch is managed per linked person.
- Alert preference is saved per linked person.
Tap "Regenerate code" to issue a new code. Share the new code with your monitor, since the old code is immediately invalid.
- Sharing via Quick share icons or More (when biometric protection is on)
- Regenerating your share code
- Viewing your Recovery Key
7. Notification settings
When notifications are turned on, your smartphone will alert you at the scheduled time.
- Open the Settings tab and expand the details of the medication you want to set up notifications for.
- Tap the "Notifications" switch to turn it on (green).
- Enter the time in the "Notification time" field. (Example: 08:00, 21:30)
- Your settings will be saved automatically.
- If you see "Notifications disabled" in red at the top of the settings screen, app notifications are turned off.
- Tap the "Enable notifications →" button to open the smartphone settings screen.
- Please change the Kusuri Memo notification to "Allow".
- When you return to the app, it will say "Notifications: On".
- If Apple Watch is paired but reminders are not shown there, open the iPhone Watch app and check that notification mirroring for Kusuri Memo is enabled.
If you take a medication multiple times a day, you can set a notification time for each dose. For example, you will receive notifications at different times, such as morning (08:00), noon (13:00), and night (20:00).
8. Appearance & Accessibility
- In Settings, open "Appearance" and choose System / Light / Dark / Sakura / Aizome.
- "System" follows your iPhone or Android appearance automatically.
- Sakura / Aizome are Premium themes. If Premium is inactive, the app returns to a free theme.
- Light or Dark applies consistently across all tabs (Home / Log / Monitor / Settings).

- Open the Settings tab.
- In the "Language" section, select 日本語 or English.
- The change applies immediately — no restart needed.
Kusuri Memo automatically adapts its Home screen layout to match iOS and Android large-text settings, including high scaling up to 300%.
- Standard text size: medication buttons appear in a grid.
- Larger text sizes: the Home screen switches to a focused single-item layout, showing one medication at a time in large format. Buttons and touch targets are enlarged, and you can use the swipe-switch menu (left/right swipe) to move between medicines.
Accessibility mode uses its own readability-first visual style, including spacing, larger controls, and simplified switching UI.
This follows your device text-size setting automatically with no manual switch in the app (iPhone: Settings → Accessibility → Larger Text / Android: Settings → Accessibility → Font size or Display size; labels can vary by device).

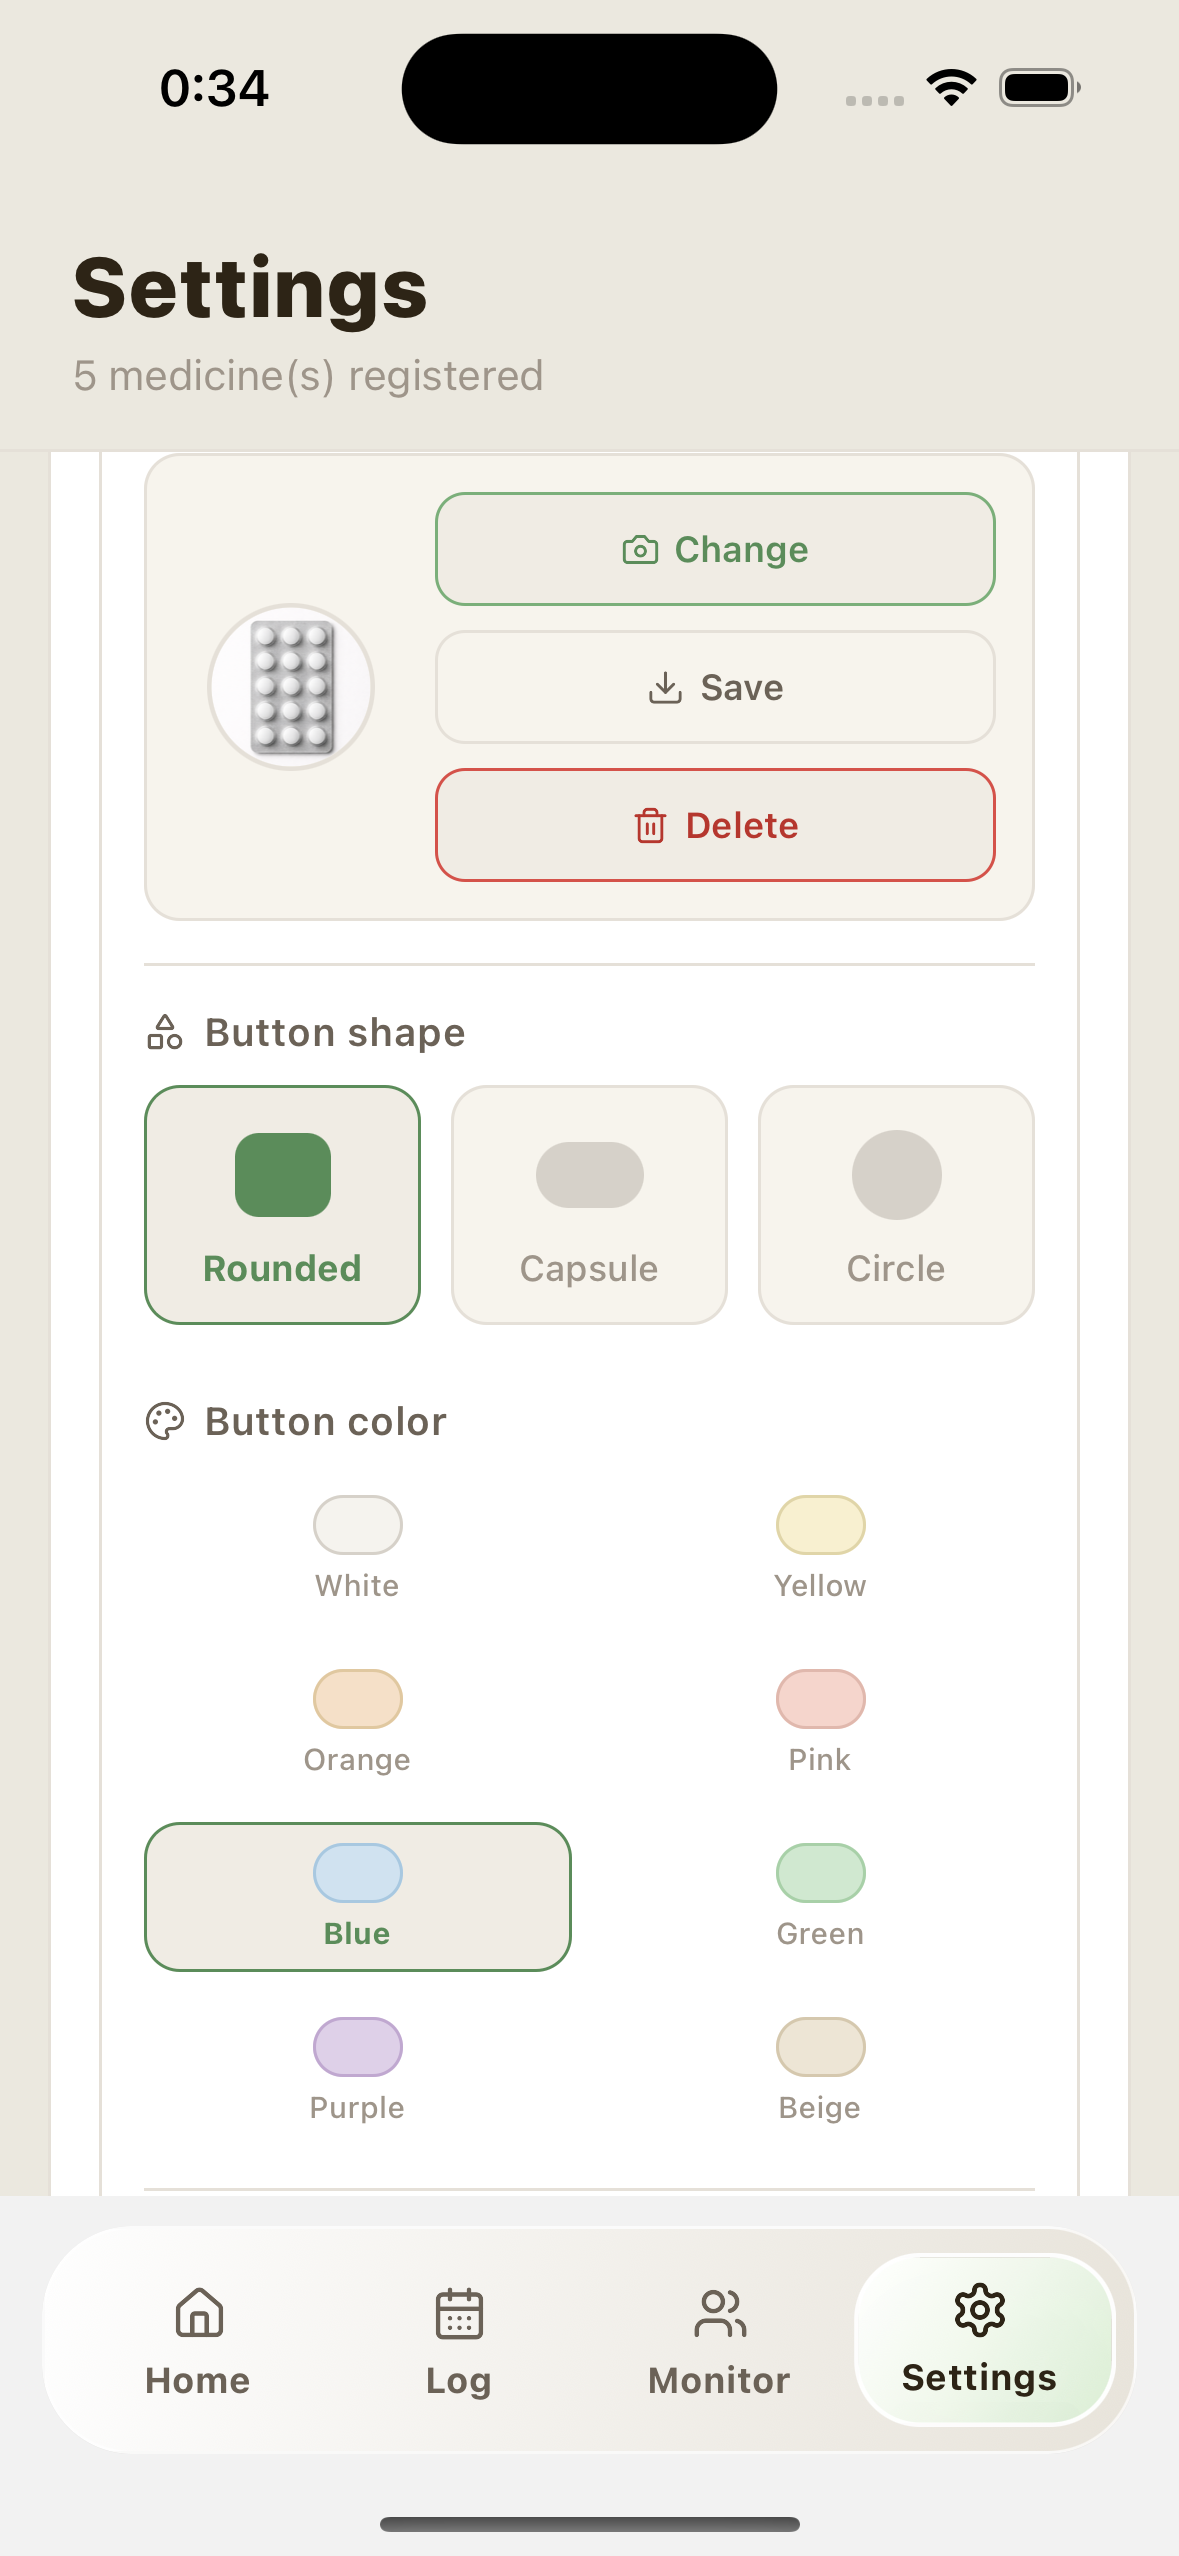
In Premium, you can customise the medication button style with colour and shape options.
9. Premium
| Feature | Free | ★ Premium |
|---|---|---|
| Number of registered medicines | Up to 1 type | Unlimited |
| Daily log entries | ✓ | ✓ |
| Cancellation (within 30 minutes) | ✓ | ✓ |
| Notification/Reminder | ✓ | ✓ |
| Appearance modes (System / Light / Dark) | ✓ | ✓ |
| Accessibility mode (large-text optimized UI) | ✓ | ✓ |
| Registration of medication photos | ✓ | ✓ |
| Log history window | Past 7 days | Past 90 days |
| Number of doses per day (multiple times) | — | 1-12 times |
| Button design change (shape/colour) |
— | ✓ |
| Monitoring sharing (Code issued) |
— | ✓ |
| View shared records (Enter code) |
✓ | ✓ |
- From the Settings tab, open the premium card to show the paywall.
- If you are returning after reinstall/device change, recover your account first in Settings -> Account protection (Apple or Recovery ID + key).
- For a new subscription, choose "Start monthly ¥400" or "Start annual ¥3,200".
- After purchase confirmation, Premium features unlock immediately.
After purchase confirmation, a Device setup window opens. This setup decides which cloud-backed features you want to enable on this device.
- A single cloud toggle appears first: Cloud features (sharing / account protection) (default is OFF for first setup).
- If it remains OFF and you press "Complete with these settings (recovery disabled)", setup finishes immediately. Premium stays active, but cloud-backed sharing and account-protection recovery remain disabled.
- If you turn it ON, cloud-backed sharing and account-protection recovery features are both enabled.
- You can change this later in Settings -> Support.
Cancellation and plan changes are managed from your store subscription settings (App Store / Google Play).
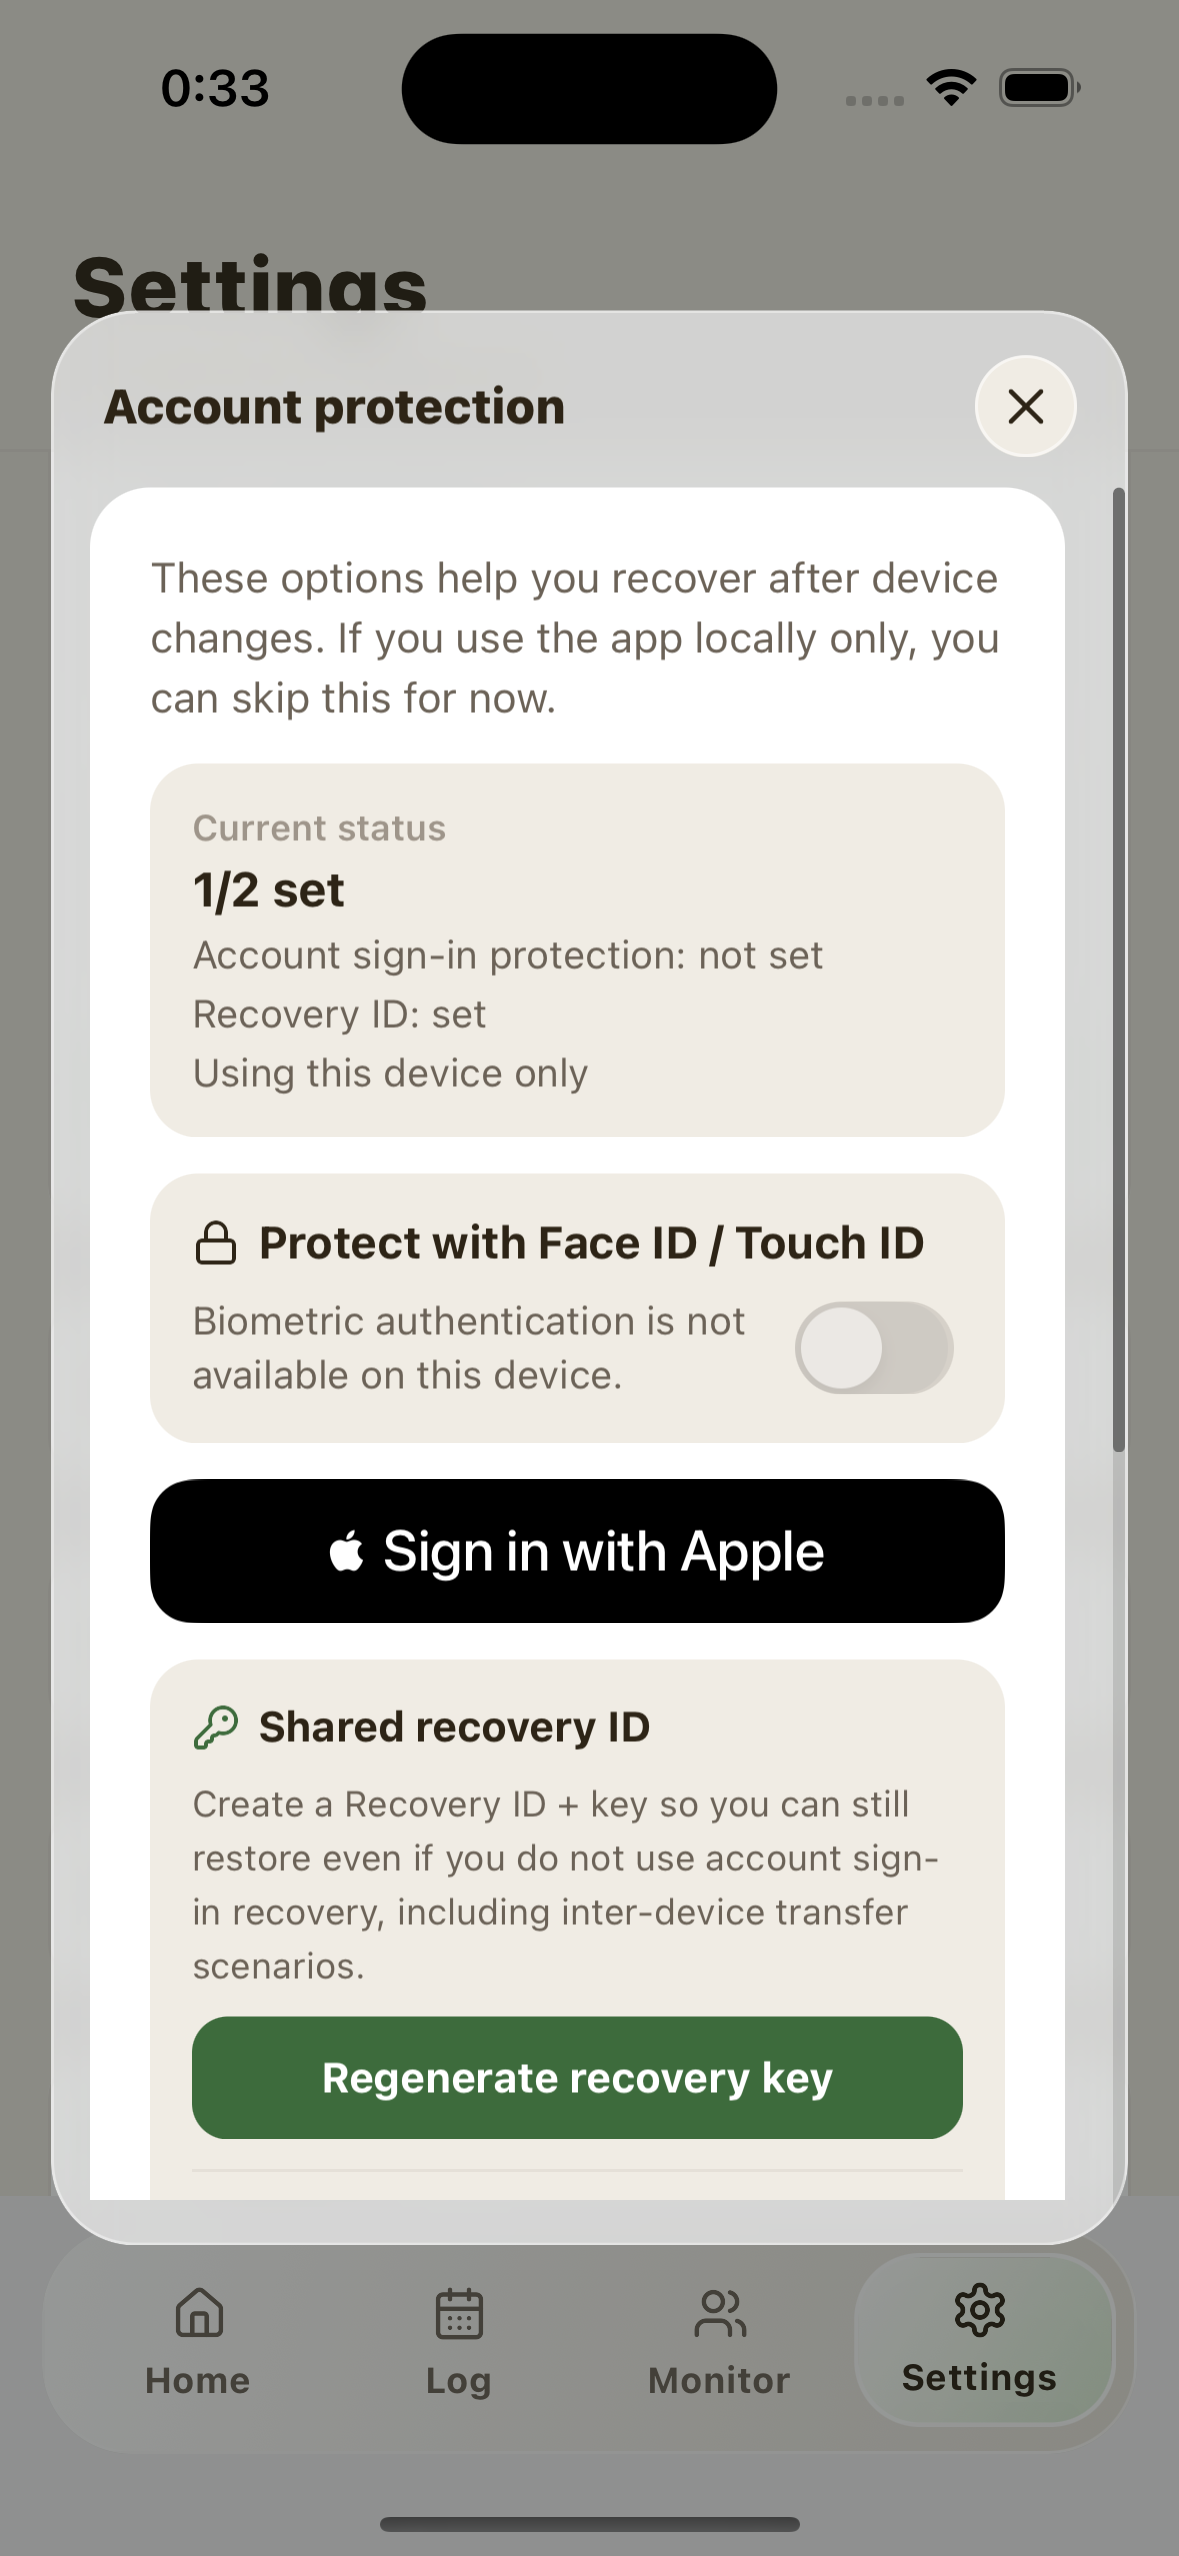
Your premium status and sharing-owner authority are stored in a protected area on your device. If you change devices or reinstall the app, you will need to recover this information. It is strongly recommended to set up account protection before you need it.
There are platform-specific account-linking methods plus a shared recovery fallback:
- Apple Sign-In (recommended on iPhone): Links your account securely using your Apple ID. This is the simplest option on iPhone. Go to Settings → Account Protection → Sign in with Apple.
- Google Sign-In (recommended on Android): Links your account securely using your Google account. This is the simplest option on Android. Go to Settings → Account Protection → Enable Google protection.
- Recovery ID + Recovery Key: An alternative if you prefer not to use Apple Sign-In or Google Sign-In. Your ID and key are generated in Settings. The key is only shown once — store it somewhere safe.
After recovery completes on the new device, the old device is designed to reset to a new-user state automatically. In normal use, you should not need extra manual old-device control actions.
- On the new device, first confirm premium status, then open Settings -> Account protection.
- Recover with the same Apple account on iPhone or the same Google account on Android.
- If platform account recovery is unavailable, restore with Recovery ID + Recovery key.
- After recovery, premium status, sharing-owner authority, and medicine data are applied on the new device. The old device returns to new-user state automatically.
10. Scenarios and troubleshooting
- Personal tracking: Record daily medicines/supplements and reduce "Did I already take it?" uncertainty.
- Family monitoring: A trusted family member checks status remotely from the Monitor tab.
- Appointment support: Show your log at a clinic visit as a practical medication notebook.
- Care-team workflows: Care homes, home-care teams, clinics, and wards can review patient self-logs with consent.
- Clinical review: Doctors and nurses can review your self-recorded history in hospital/clinic settings with consent.
- Short-term intensive tracking: Follow adherence closely after surgery or when starting a new treatment.
Owner cannot load/see a shared code
If it still fails, follow the in-app guidance and recover your existing account from Account protection (Apple/Google or Recovery ID + key), then retry.
Monitor shows: "This share code cannot be confirmed at this time. Please try later."
If it still fails, ask the owner to re-share the latest code (after regeneration, previous codes are invalid).
If repeated invalid entries trigger a cooldown, wait for the countdown to finish before trying again.
Recovery shows: "Invalid attempt"
The app shows invalid attempts (`x/5`). At 5 invalid attempts within 10 minutes, recovery is locked for 30 minutes and the input field remains disabled until cooldown ends.
Monitor updates look delayed or partially stale
If one refresh does not catch up, wait 10-20 seconds and refresh again. A follow-up reconcile check may need one extra cycle to complete.
Old device does not look reset after transfer
If it appears stale, restart the app once on the old device so it can reload the latest session state.
Billing continues after in-app account deletion
Cancel separately in your store subscription settings to stop billing.
11. FAQ
What if you press the wrong medicine?
Will my data be deleted if I delete the app?
Is there a fee to enter someone’s shared code?
Will my data be lost if I cancel my subscription?
Where are the photos saved?
Can I transfer my data when changing models?
What if someone you don't know sees your shared code?
How often can I refresh the Monitor page?
Can I receive notifications for multiple medications at different times?
Can I change the name of my medication later?
I want to remove my medication, what should I do?
12. Privacy policy
Last updated: April 3, 2026
Thank you for using Kusuri Memo (hereinafter referred to as "this application"). This Privacy Policy describes how we collect, use and protect your information.
This app stores the following information locally on your device:
- Name of registered medicine, dosing schedule, and dosing record
- Notification settings
- Subscription status
- Medication photos (stored on device only)
For normal free use, medication content and dose history are managed on your device. If server-backed features are enabled, only the minimum data needed for those features is sent.
When using account-protection restore or Monitoring sharing, the following information can be sent to Supabase (database service):
- Share code
- Medicine name
- Dose timestamp
- Dose status
- Encrypted restore backup payload (medication definitions, dose logs, and monitor-list entries: code/display name/added time)
This information is used only for monitoring sharing and not for any other purpose. Backup payloads are used only for restore/transfer safety. Photo data is not sent to an external server.
Internal identifiers or state needed for subscription coordination, monitoring sharing, or account-protection features may also be created or stored server-side. These do not include your medication photos or the medication-content payload itself.
For shared data continuity and disaster recovery, server side data is mirrored to a second database. The standby project is used for recovery operations and follows the same access-control model.
The production database is hosted in Japan (Tokyo region) on Supabase.
This app uses the following third party services:
Used for monitoring-sharing synchronisation, encrypted restore backup storage (including monitor-list entries), and cold-standby disaster recovery operations. The production database is hosted in Japan (Tokyo region).
Privacy policy →
Used for crash and diagnostic reports to detect and improve app defects. Reports may include technical identifiers (for example app-instance or device context) needed to investigate failures, and are not used for advertising tracking.
Privacy policy →
This app does not use advertising SDKs or third-party analytics SDKs. If we add anonymous first-party usage metrics in a future release, they will be limited to coarse product metrics that do not include medication-content payloads, and this policy will be updated before release.
This app is not intended for children under the age of 13. We do not knowingly collect personal information from children under the age of 13.
You can permanently delete all your data using the in-app account deletion feature (Settings → Delete account and data).
When you delete your account, we retain a pseudonymized consent record (no health data, no personal identifiers) for up to 5 years to demonstrate your confirmed consent to deletion. All medication, dose, and personal data is permanently deleted immediately.
Medication photos are only stored on your device. We do not send, upload, or share any photo data to external servers.
We take appropriate technical measures to protect your data. Family sharing data is transmitted over an encrypted connection.
We may update this privacy policy. If there are any changes, we will notify you through an app update.
If you have any questions regarding privacy, please contact us via the support email on the settings screen.
13. Contact
If you have any questions or requests, please feel free to contact us using the form below. We will respond as soon as possible.
Please contact us by email.
* Please include your app version and device type (iPhone/Android) so we can respond more quickly.
Please review our Privacy Policy.